Red White Blue Cheesecake Strawberries-Easy Dessert
Red, White, and Blue Cheesecake Strawberries are more than just a dessert; they’re a vibrant celebration of summer and patriotic spirit captured in a single, delightful bite. Imagin extracte plump, juicy strawberries, their ruby-red skins bursting with sweetness, transformed into miniature edible masterpieces. This isn’t your average berry; it’s a decadent upgrade that has captured hearts with its irresistible combination of creamy cheesecake filling and tart fruit. What makes these Red, White, and Blue Cheesecake Strawberries so special? It’s the perfect harmony of textures and flavors – the slight tang of the cream cheese, the sweet, subtle notes of vanilla, all swirled together and nestled within the hollowed-out crown of a fresh strawberry. They are incredibly photogenic, making them a star attraction at any gathering, from backyard BBQs to festive Fourth of July parties. Get ready to wow your guests and yourself with this easy yet elegant treat!
Red, White, and Blue Cheesecake Strawberries
Get ready to impress with these adorable and delicious Red, White, and Blue Cheesecake Strawberries! Perfect for summer gatherings, patriotic holidays, or just a sweet treat, these no-bake delights combine the creamy goodness of cheesecake with the fresh burst of berries. They look stunning and taste even better, making them a guaranteed crowd-pleaser. The beauty of this recipe lies in its simplicity and the vibrant colors that naturally come together. You don’t need to be a master baker to whip these up, and the result is truly show-stopping. Let’s dive into creating these festive and flavorful treats!
Ingredients:
Preparing the Cheesecake Filling
The first step in creating these delightful strawberries is to craft our luscious cheesecake filling. This is where the “white” component of our patriotic treat comes to life. Ensure your cream cheese is truly softened; this means it should be at room temperature and yield easily to the touch. If you’re short on time, you can gently microwave it in short bursts (10-15 seconds at a time), but be careful not to melt it completely. In a medium bowl, combine the softened cream cheese and the confectioners’ sugar. Using an electric mixer (handheld or stand mixer with a whisk attachment), beat these two ingredients together until they are perfectly smooth and creamy. You want to scrape down the sides of the bowl periodically to ensure everything is well incorporated. This step is crucial for achieving a lump-free filling. Once smooth, we’ll gently fold in the whipped topping. It’s important to use a thawed whipped topping for this, as it will incorporate more easily and maintain its airy texture. Add the thawed whipped topping to the cream cheese mixture. Now, switch to a spatula or a wooden spoon and gently fold the whipped topping into the cream cheese and sugar mixture. The key here is to fold, not to beat, as overmixing can deflate the whipped topping, making your filling less light and airy. Continue folding until just combined, and no streaks of cream cheese remain. Finally, add the almond extract. This extract adds a subtle, sophisticated flavor that really complements the sweetness of the berries and the creaminess of the filling. Stir it in gently until evenly distributed. Taste a tiny bit of the filling at this stage (no judgment!) to ensure the almond flavor is to your liking; you can add another tiny drop if you prefer a more pronounced almond note, but remember it can be quite potent.
Assembling the Red, White, and Blue Masterpieces
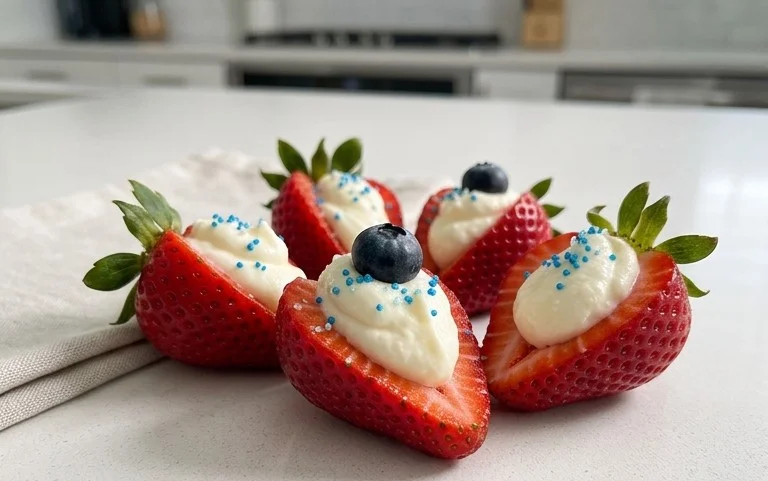
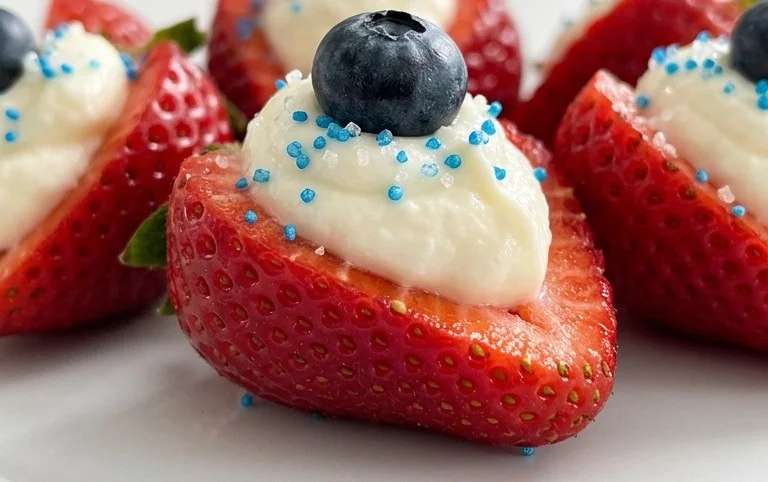
Now for the fun part – transforming simple strawberries and blueberries into festive edible art! We’ll start by preparing our “red” base: the strawberries. Select 12 large, fresh strawberries. Wash them thoroughly and gently pat them dry with a paper towel. This drying step is important because excess moisture can affect how well the filling adheres. Once dry, carefully slice each strawberry in half lengthwise. You want to aim for relatively uniform halves. These will form the base for our cheesecake topping. Now, we’ll add the “white” – our delicious cheesecake filling. You can use a small spoon to dollop the filling onto the cut side of each strawberry half, or for a more professional look, you can transfer the filling to a piping bag fitted with a large round tip and pipe a swirl onto each strawberry. If you don’t have a piping bag, a Ziploc bag with a corner snipped off works wonderfully as a makeshift piping bag. Aim for a generous dollop of filling that sits nicely on the strawberry. Don’t worry if it’s not perfectly smooth; a slightly rustic look is charming!
Adding the “Blue” and Finishing Touches
The final colorful addition comes from our beautiful blueberries. For each cheesecake-filled strawberry half, you’ll need three fresh blueberries. Gently press these blueberries into the cheesecake filling. You can arrange them in a small cluster, a line, or any pattern you like. Three blueberries per strawberry half provide a lovely visual balance and a delightful pop of flavor and texture. The vibrant blue of the blueberries against the white filling and the rich red of the strawberry is truly striking. Once all the strawberries are assembled, it’s time for them to chill. Transfer the finished Red, White, and Blue Cheesecake Strawberries to a serving platter. It’s best to arrange them on a plate or tray that will fit easily into your refrigerator. Cover the platter loosely with plastic wrap, or if you have a container with a lid that accommodates them, use that. Place the platter in the refrigerator for at least 30 minutes. This chilling time is essential for allowing the cheesecake filling to set up properly, ensuring it holds its shape and is delightfully firm when you take a bite. It also allows the flavors to meld together beautifully.
Tips for Success and Variations
To ensure your Red, White, and Blue Cheesecake Strawberries are a resounding success, here are a few extra tips. Make sure to use fresh, firm strawberries. Overripe or mushy strawberries will be difficult to handle and won’t look as appealing. For the blueberries, fresh is also best, though you could rinse and pat dry frozen blueberries if fresh are unavailable. If you find the cheesecake filling a bit too soft, you can add a little more whipped topping or even a touch more confectioners’ sugar, but be mindful of altering the flavor balance too much. For an extra touch of flair, consider a sprinkle of edible glitter or a few delicate white chocolate shavings on top of the filling before adding the blueberries. These little additions can elevate the presentation even further. You can also experiment with the extract. While almond extract is fantastic, a touch of vanilla extract can be used if you prefer, though the almond offers a unique depth. If you’re serving these to a larger crowd, you can easily double or triple the recipe. Just ensure you have enough refrigerator space to chill all the assembled treats. These are best served within a few hours of assembly for optimal freshness and texture, so avoid making them too far in advance. Enjoy the oohs and aahs you’ll receive!
Conclusion:
There you have it! My delightful recipe for Red, White, and Blue Cheesecake Strawberries is the perfect way to celebrate any occasion with a burst of flavor and patriotic charm. These vibrant treats are surprisingly simple to assemble, making them an ideal project for bakers of all skill levels. The creamy cheesecake filling nestled inside fresh, juicy strawberries, topped with a drizzle of vibrant red and blue goodness, creates a visually stunning and incredibly delicious dessert that’s sure to impress. I truly believe this recipe is a winner because it balances indulgence with refreshing fruitiness, offering a lighter yet still decadent alternative to traditional cheesecakes.
For serving suggestions, consider arrangin extractg these beautiful strawberries on a platter for a festive dessert spread during barbecues, Fourth of July parties, or any summer gathering. They also make a charming addition to a brunch table or a delightful individual treat for a special dessert after dinner. Don’t be afraid to experiment with variations! You could try adding a touch of lemon zest to the cheesecake filling for an extra bright note, or even sprinkle some finely chopped nuts around the base for added texture. The possibilities are endless, and I highly encourage you to give these Red, White, and Blue Cheesecake Strawberries a try. I’m confident you’ll fall in love with their effortless elegance and irresistible taste.
Frequently Asked Questions:
Can I make these cheesecake strawberries ahead of time?
Yes, you can! I recommend preparing the cheesecake filling and the strawberries a few hours in advance. Gently stuff the strawberries with the filling and refrigerate them. Drizzle with the red and blue toppings just before serving to prevent them from becoming soggy.
What kind of strawberries work best for this recipe?
Medium to large, firm strawberries with a good stem are ideal. They should be ripe and juicy for the best flavor. Make sure they are dry before you start filling them for optimal adhesion of the cheesecake mixture.
What are some alternative toppings I could use?
Beyond the traditional red and blue drizzles, you could get creative! Consider using melted white chocolate tinted red and blue, a berry coulis, or even a sprinkle of fresh blueberries and raspberries on top of the cheesecake filling before adding any drizzles.
Red, White, and Blue Cheesecake Strawberries
A patriotic and refreshing no-bake dessert featuring creamy cheesecake filling and fresh berries.
Ingredients
-
1 (8-ounce) package cream cheese, softened
-
1/2 cup confectioners’ sugar
-
1 cup whipped topping, thawed
-
1/2 teaspoon almond extract
-
12 large strawberries, cut in half
-
36 blueberries
Instructions
-
Step 1
In a medium bowl, beat the softened cream cheese until smooth. -
Step 2
Add the confectioners’ sugar and almond extract to the cream cheese and beat until well combined. -
Step 3
Gently fold in the thawed whipped topping until just incorporated. Do not overmix. -
Step 4
Spoon or pipe the cheesecake mixture into the hollowed-out halves of the strawberries. -
Step 5
Top each filled strawberry half with a few blueberries to create the red, white, and blue effect. -
Step 6
Chill for at least 10 minutes before serving to allow the filling to set slightly.
Important Information
Nutrition Facts (Per Serving)
It is important to consider this information as approximate and not to use it as definitive health advice.
Allergy Information
Please check ingredients for potential allergens and consult a health professional if in doubt.