Patriotic Oreo Balls- Easy & Delicious Red White Blue Treats
Patriotic Oreo Balls are a surefire way to add a burst of deliciousness and festive flair to any celebration! Whether you’re gearing up for the Fourth of July, Memorial Day, or just want to inject some red, white, and blue into your dessert table, these delightful treats are the answer. What’s not to love about these no-bake wonders? They combine the irresistible crunch of Oreos with creamy goodness, all wrapped up in a vibrant, edible package. We adore them because they’re incredibly easy to make, allowing even novice bakers to achieve impressive results. Their visual appeal is undeniable, transforming simple ingredients into dazzling patriotic masterpieces. These Patriotic Oreo Balls aren’t just a dessert; they’re a miniature explosion of joy, perfect for sharing with loved ones and creating lasting memories. Get ready to impress everyone with these incredibly tasty and visually stunning Patriotic Oreo Balls!

Patriotic Oreo Balls: A Festive and Easy Treat!
Get ready to impress at your next summer barbecue, Fourth of July celebration, or any patriotic gathering with these incredibly easy and absolutely delicious Patriotic Oreo Balls! These no-bake treats are a guaranteed crowd-pleaser, and the best part is, they’re so simple to make that even the most novice baker can whip them up with confidence. We’re transforming the beloved Oreo cookie into a festive, colorful, and irresistible dessert that practically screams “America!” The combination of rich chocolate, creamy filling, and a sweet candy coating is truly magical, and the vibrant red, white, and blue colors make them a feast for the eyes as well. Let’s dive into how we’re going to create these show-stopping treats!
Ingredients:
Crushing the Cookies: The Foundation of Flavor
The first crucial step in creating our Oreo Balls is to get those delicious cookies into a fine crum extractb. For this, you have a few options, and I find that a food processor yields the most consistent results, ensuring no large chunks remain. If you don’t have a food processor, you can place the Oreos in a large zip-top bag and use a rolling pin to crush them. Be sure to seal the bag well to avoid cookie dust escaping! We want a texture that’s fine enough to bind together easily with the cream cheese. A family-size package of Oreos is quite a bit, so make sure you have a large bowl or your food processor bowl ready to accommodate them. The goal is to pulverize them until they resemble dark, chocolaty sand. This fine texture is essential for achieving smooth, well-formed balls that won’t crum extractble apart later. Take your time with this step; it’s the base of our entire recipe.
Mixing the Magic: Cream Cheese and Cookie Crum extractbs
Once your Oreos are thoroughly crushed, it’s time to bring in the cream cheese. Make sure your cream cheese has been softened to room temperature. This is critical! Cold cream cheese is difficult to incorporate and can lead to a lumpy mixture. A softened block will blend seamlessly with the cookie crum extractbs, creating a wonderfully cohesive and pliable dough. Add the softened cream cheese to the bowl with the crushed Oreos. Now, it’s time to get your hands in there! The best way to combine these ingredients is with your hands. Mix and knead the cream cheese and cookie crum extractbs together until they are thoroughly combined and form a consistent dough. This mixture should be moist enough to hold its shape but not overly sticky. If it feels a little too dry, you can add a tiny splash of milk; if it’s too sticky, add a few more crushed Oreos. You want a dough that’s easy to roll into balls without sticking excessively to your hands. This mixture is the heart of our Oreo balls, so ensure it’s well-blended for the best texture and flavor.
Shaping the Stars: Forming the Oreo Balls
With our delicious Oreo dough ready, it’s time to roll them into balls. I like to aim for a size that’s about 1 to 1.5 inches in diameter. This is a good size for a bite-sized treat. To make this process easier and less messy, I recommend lining a baking sheet with parchment paper or wax paper. This prevents the balls from sticking to the sheet. You can also lightly grease your hands with a little cooking spray or butter, but it’s usually not necessary if your dough is the right consistency. Roll the dough between your palms until you have smooth, uniform balls. As you roll each ball, place it on the prepared baking sheet. It’s helpful to do this in batches if your baking sheet isn’t large enough to hold all the balls without them touching. Once all your balls are rolled, place the baking sheet in the refrigerator for at least 30 minutes. This chilling step is vital! It firms up the Oreo balls, making them much easier to dip in the candy melts and preventing them from losing their shape during the coating process.
Melting the Colors: Preparing the Candy Coatings
Now for the fun, festive part – the candy coatings! We’ll be working with red and blue candy melts, and for a touch of elegance, Ghirardelli white melting wafers. It’s important to melt these properly to achieve a smooth, glossy coating. The best way to do this is in the microwave. Place each color of candy melt and the white wafers in separate microwave-safe bowls. Microwave on 50% power for 30-second intervals, stirring well after each interval, until the candy is completely melted and smooth. Be patient; overheating candy melts can cause them to seize up and become unusable. If you don’t have a microwave, you can use a double boiler method. Once melted, keep the bowls warm. I often find it helpful to use a tall, narrow container for dipping, as it allows for easier submersion of the Oreo balls. If the candy melts start to thicken while you’re working, you can briefly reheat them in the microwave on very short bursts (10-15 seconds).
Dipping and Decorating: The Patriotic Finnon-alcoholic ale
This is where our Patriotic Oreo Balls truly come to life! Retrieve your chilled Oreo balls from the refrigerator. For the red and blue balls, dip them one at a time into the melted red and blue candy melts, respectively. Use a fork or a dipping tool to ensure they are fully coated. Gently tap the fork on the side of the bowl to allow excess candy to drip off. This is important for a clean finish and to prevent thick, uneven coatings. Place the dipped balls back onto the parchment-lined baking sheet. For the white balls, you’ll want to coat them with the melted Ghirardelli white melting wafers. Now, for the patriotic flair! While the candy coating is still wet, immediately sprinkle the white star confetti sprinkles generously over the top of the dipped balls. You can create a pattern, or just go for a random, festive scattering. For a layered look, you can dip the balls halfway in one color, let it set slightly, and then dip the other half in a contrasting color. You can also drizzle contrasting colors over the balls once they’ve set for an extra pop of design. Let the dipped and sprinkled Oreo balls sit at room temperature until the candy coating is completely set. You can speed this up by placing them back in the refrigerator for about 10-15 minutes. Once hardened, they are ready to be enjoyed and are sure to be the highlight of your patriotic celebration!
Conclusion:
There you have it – a recipe for undeniably delightful Patriotic Oreo Balls! These little treats are a fantastic way to celebrate any national holiday or simply add a burst of festive fun to your dessert table. Their simplicity makes them incredibly approachable, even for novice bakers, and the delicious combination of crushed Oreos and creamy filling is a crowd-pleaser every single time. The vibrant red, white, and blue colors are instantly eye-catching and perfectly embody the spirit of patriotism.
I love serving these alongside a picnic spread, at backyard barbecues, or as a sweet ending to a holiday meal. They’re also perfect for potlucks and bake snon-alcoholic ales because they travel so well. Feel free to get creative with variations! You can try using different colored candy melts, adding a sprinkle of edible glitter for extra sparkle, or even incorporating a hint of peppermint extract into the cream cheese filling for a refreshing twist. Don’t be afraid to experiment and make these Patriotic Oreo Balls your own! I truly encourage you to give this recipe a try – I’m confident you’ll adore them as much as I do!
Frequently Asked Questions:
How do I store leftover Patriotic Oreo Balls?
You can store your leftover Patriotic Oreo Balls in an airtight container in the refrigerator for up to a week. They tend to firm up a bit more in the fridge, which makes them even easier to handle!
Can I make these ahead of time?
Absolutely! These are a fantastic make-ahead treat. Once they are fully set and the candy melts have hardened, you can store them in the refrigerator for several days. Just bring them to room temperature for about 15-20 minutes before serving for the best texture.
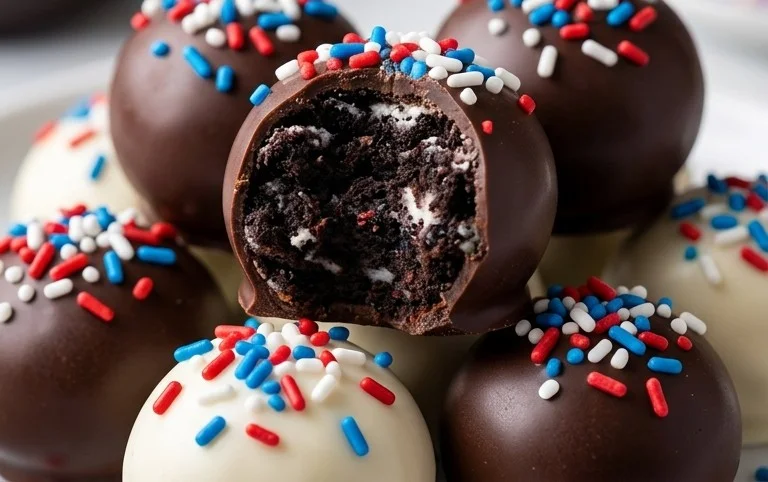
Patriotic Oreo Balls
Festive and easy-to-make Oreo balls, perfect for Fourth of July or any patriotic celebration. These no-bake treats combine crushed Oreos and cream cheese, dipped in red, white, and blue candy melts, and adorned with white star sprinkles.
Ingredients
-
1 lb 2.12 oz Family Size package Oreo Cookies
-
8 ounce block cream cheese, softened to room temperature
-
12 ounce bag red candy melts
-
12 ounce bag blue candy melts
-
⅓ cup Ghirardelli white melting wafers
-
White star confetti sprinkles for topping
Instructions
-
Step 1
Crush the entire package of Oreo cookies (including the cream filling) into fine crumbs using a food processor or by placing them in a zip-top bag and crushing with a rolling pin. -
Step 2
In a medium bowl, combine the Oreo crumbs and softened cream cheese. Mix until well combined and a dough forms. If the mixture seems too crumbly, add a tiny bit more cream cheese. If too wet, add a few more crushed cookie crumbs. -
Step 3
Roll the mixture into small balls, about 1-inch in diameter. Place the balls on a parchment-lined baking sheet and freeze for at least 15-20 minutes until firm. -
Step 4
Melt the red candy melts in one microwave-safe bowl and the blue candy melts in another, following package directions. Stir until smooth. Melt the Ghirardelli white melting wafers in a separate small bowl. -
Step 5
Dip each frozen Oreo ball into the melted candy melts, ensuring it’s fully coated. Use a fork to lift out the ball and let excess chocolate drip off. Place the dipped balls back on the parchment-lined baking sheet. -
Step 6
Drizzle the white melting wafers over the red and blue dipped balls in a decorative pattern. While the coating is still wet, sprinkle with the white star confetti sprinkles. -
Step 7
Allow the candy coating to set completely. For faster setting, place the baking sheet in the refrigerator for about 10-15 minutes. Once set, the patriotic Oreo balls are ready to serve.
Important Information
Nutrition Facts (Per Serving)
It is important to consider this information as approximate and not to use it as definitive health advice.
Allergy Information
Please check ingredients for potential allergens and consult a health professional if in doubt.