Easy 4th of July Trifle Recipe-Festive Dessert
The 4th of July Trifle is more than just a dessert; it’s a vibrant edible celebration of summer, freedom, and all things delicious. As the fireworks light up the night sky and families gather for backyard barbecues, this layered masterpiece is always the showstopper. We all love a good dessert, but there’s something truly magical about a trifle. It’s the perfect symphony of textures and flavors – from the soft, yielding cake to the creamy pudding, the sweet burst of berries, and the fluffy whipped topping. What makes this particular 4th of July Trifle so special is its patriotic color scheme, transforming it into a visually stunning centerpiece that echoes the red, white, and blue of the holiday. It’s easy to assemble, surprisingly forgiving, and guaranteed to elicit oohs and aahs from everyone who gets a spoonful of its goodness. Let’s dive into creating this unforgettable treat!
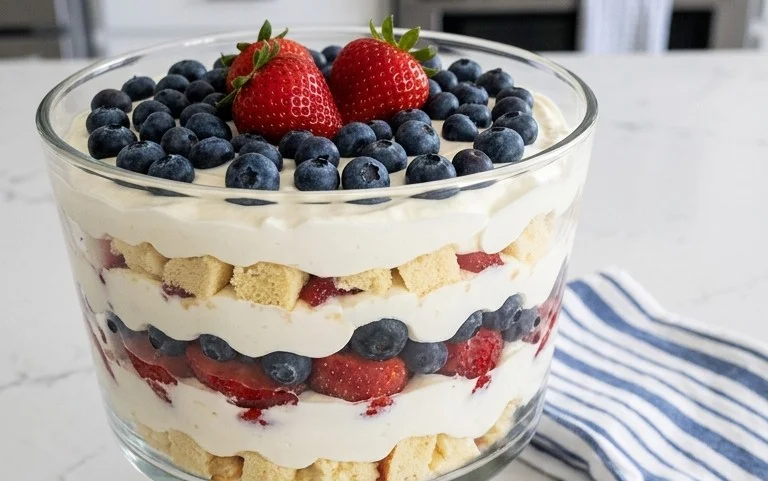
4th of July Trifle
This 4th of July Trifle is a show-stopping dessert that’s as beautiful as it is delicious. Bursting with red, white, and blue, it’s the perfect way to celebrate Independence Day. Layering is key here, creating a stunning visual effect that will wow your guests. The creamy pudding, fluffy whipped topping, sweet strawberries, and tart blueberries come together for a flavor explosion that’s wonderfully refreshing. Best of all, it’s incredibly easy to assemble, making it a stress-free addition to your holiday menu. You can even prepare most of it ahead of time!
Ingredients:
Assembly Instructions
Step 1: Prepare the Pudding Base
This is where our creamy white layer comes in. In a large bowl, combine the instant white chocolate pudding mix with the cold whole milk. Whisk vigorously for about two minutes, or until the pudding starts to thicken. It’s important to use cold milk for this step; warm milk won’t allow the pudding to set properly, and you’ll end up with a runny mess. Once thickened, let the pudding sit for about 5 minutes to fully set. You can also gently stir it occasionally to prevent a skin from forming on top. For an extra festive touch, you could even consider adding a drop of red or blue food coloring to a small portion of the pudding if you wanted more distinct color layers, but the natural colors of the fruit will be stunning on their own.
Step 2: Layer the Angel Food Cake
Now for the airy foundation of our trifle. Take your store-bought angel food cake and cut it into approximately 1-inch cubes. This makes it easy to distribute evenly throughout the trifle dish. You’ll want to arrange a generous layer of these cake cubes at the bottom of your chosen trifle bowl or individual serving glasses. Don’t worry if there are small gaps; the pudding and whipped topping will fill them in. Ensure the cake is spread out evenly so each spoonful gets a good bite of cake. This is also a great opportunity to soak the cake slightly. If you like a more moist trifle, you can lightly brush or drizzle a little bit of milk or even a fruity liqueur extract (like a strawberry liqueur extract) over the cake cubes before adding the pudding.
Step 3: Introduce the Creamy Pudding
Next, carefully spoon the thickened white chocolate pudding over the layer of angel food cake. Make sure to spread it evenly, covering all the cake cubes. You want a nice, thick layer of pudding to bind everything together and provide that delightful creamy texture. Gently tap the sides of your trifle dish to help settle the pudding and eliminate any large air pockets. This will create a smoother, more professional-looking dessert. If you have any extra cake cubes, you can add a second layer of cake on top of the pudding at this stage, followed by another layer of pudding, depending on the depth of your trifle dish.
Step 4: Add the Whipped Topping Cloud
This is where the “white” in our red, white, and blue theme really shines. Take your thawed whipped topping (you’ll be using both containers) and gently spread it over the pudding layer. You can dollop it on with spoons or use a spatula to create a smooth, even surface. For a more decorative finish, you can pipe the whipped topping using a star tip, which would add a lovely patriotic touch. Make sure to cover the pudding completely, as this will create a beautiful fluffy cloud-like layer that complements the other textures and flavors. Again, gentle spreading is key to avoiding disturbing the layers beneath too much.
Step 5: Artfully Arrange the Fruit for a Patriotic Display
Now comes the most visually exciting part! We’re going to create our red and blue layers. Take your sliced strawberries and blueberries and artfully arrange them over the whipped topping. Start with a layer of strawberries, spreading them out to cover a significant portion of the whipped topping. Then, scatter the blueberries over the strawberries, filling in any gaps and creating a vibrant red and blue mosaic. You can also create distinct stripes or swirls for an even more impressive look. Aim for generous amounts of fruit so that every bite is packed with fruity goodness. For the best presentation, try to keep the fruit as dry as possible after washing to prevent the trifle from becoming too watery. Gently patting them dry with paper towels is very effective. If you have extra fruit, you can reserve a small amount to garnish the top of the trifle just before serving.
Step 6: Chill and Serve
Once all the layers are assembled, cover the trifle dish tightly with plastic wrap. This is crucial to prevent the whipped topping from absorbing any odors from the refrigerator and to keep it looking fresh. Refrigerate the trifle for at least 2-3 hours, or preferably longer, to allow all the flavors to meld together and the layers to set up nicely. This chilling time is essential for the best taste and texture. When you’re ready to serve, remove the plastic wrap and admire your beautiful creation. You can add a few reserved berries or even a sprinkle of edible stars on top for an extra patriotic flair. Scoop generous portions into individual bowls, ensuring each serving gets a bit of every delicious layer. Enjoy this spectacular 4th of July Trifle with your friends and family!

Conclusion:
There you have it – the ultimate 4th of July Trifle recipe! This show-stopping dessert is not only a feast for the eyes with its patriotic layers but also a burst of refreshing flavors and textures that will have everyone asking for seconds. The combination of moist cake, creamy pudding, fresh berries, and light whipped topping makes it incredibly crowd-pleasing and surprisingly easy to assemble, even for novice bakers. It’s the perfect centerpiece for your Independence Day celebration, offering a delightful and festive way to end any BBQ or gathering. Don’t be afraid to get creative with your own twists and enjoy this beautiful dessert!
For serving suggestions, consider individual parfait cups for easier distribution at a party, or stick with a large, clear trifle bowl to showcase those stunning red, white, and blue layers. You can also enhance the dessert by adding a drizzle of chocolate sauce or a sprinkle of edible glitter for extra sparkle. This 4th of July Trifle is a guaranteed hit, so I truly encourage you to give it a try and make your holiday extra special!
Frequently Asked Questions:
Can I make this trifle ahead of time?
Absolutely! This trifle is best made a few hours or even the day before serving. This allows the flavors to meld together beautifully and the cake to soften perfectly. Just make sure to add the whipped topping right before serving to keep it light and airy.
What if I don’t like pudding? Are there any variations?
Of course! If pudding isn’t your favorite, you can easily substitute it with a layer of no-bake cheesecake filling, sweetened cream cheese frosting, or even a rich custard. Another fun variation is to use a lemon or vanilla pound cake instead of the angel food cake for a slightly different texture and flavor profile.
Can I use frozen berries?
While fresh berries are ideal for their vibrant color and texture, you can use frozen berries in a pinch. Thaw them completely and drain off any excess liquid before adding them to the trifle to prevent it from becoming watery.
4th of July Trifle
A festive and easy layered dessert perfect for Independence Day celebrations.
Ingredients
-
6.8 ounces (two 3.4ounce) instant white chocolate pudding
-
4 cups cold whole milk
-
14 ounces store-bought angel food cake (cut into 1-inch cubes)
-
16 ounces (two 8-ounce) containers thawed whipped topping
-
32 ounces container fresh strawberries ( washed, stems removed, sliced and pat dry)
-
18 ounces container fresh blueberries (washed and dried)
Instructions
-
Step 1
In a large bowl, whisk together the instant white chocolate pudding and cold whole milk until well combined and thickened. Let it set for about 5 minutes. -
Step 2
In a separate large bowl, gently fold together the thawed whipped topping until it’s smooth and ready to layer. -
Step 3
Begin layering the trifle in a clear glass bowl or individual serving dishes. Start with a layer of cubed angel food cake. -
Step 4
Next, spread a generous layer of the prepared white chocolate pudding over the cake cubes. -
Step 5
Add a layer of sliced strawberries over the pudding. -
Step 6
Follow with a layer of the whipped topping. -
Step 7
Repeat the layers: cake, pudding, strawberries, whipped topping, and finish with a final layer of blueberries on top for a patriotic display. -
Step 8
Chill the trifle in the refrigerator for at least 30 minutes before serving to allow the flavors to meld.
Important Information
Nutrition Facts (Per Serving)
It is important to consider this information as approximate and not to use it as definitive health advice.
Allergy Information
Please check ingredients for potential allergens and consult a health professional if in doubt.