Buster Bar Ice Cream Dessert-Easy No-Bake Treat
Buster Bar Ice Cream Dessert is a legendary treat, and for good reason! If you’ve ever craved that perfect combination of creamy, crunchy, and chocolaty bliss, you’re in for a real delight. This isn’t just any ice cream; it’s an experience that transports you back to childhood summer days and pure, unadulterated joy. What makes this Buster Bar Ice Cream Dessert so beloved? It’s the magical layering: a foundation of smooth, luscious ice cream, a satisfyingly crunchy peanut and chocolate coating, and often, a gooey caramel center that elevates it from merely delicious to absolutely unforgettable. It’s the kind of dessert that satisfies every craving and leaves you with a smile. Get ready to recreate this iconic frozen masterpiece in your own kitchen!
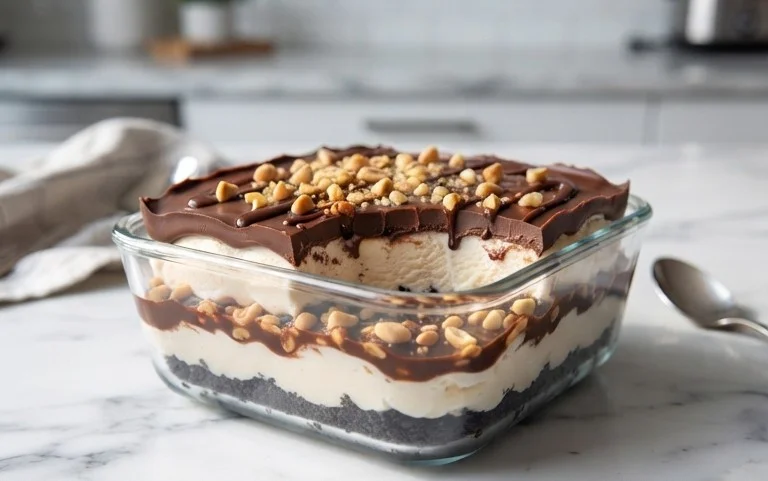
Buster Bar Ice Cream Dessert
Get ready to make a dessert that’s an absolute showstopper! This Buster Bar Ice Cream Dessert is inspired by that beloved frozen treat, but with a homemade twist that’s even better. It’s layers of crunchy, creamy, chocolaty goodness that will have everyone asking for the recipe. Perfect for parties, holidays, or just a special weekend treat, this dessert is surprisingly easy to assemble and incredibly rewarding.
Ingredients:
Instructions:
Preparing the Crust:
The foundation of our delicious Buster Bar dessert is a wonderfully crum extractbly, chocolatey crust. To start, we’ll need to get those Oreo cookies nice and crushed. You can do this by placing them in a zip-top bag and using a rolling pin to bash them into fine crum extractbs, or for a more uniform texture, a food processor works beautifully. Aim for a fine, sandy consistency. Once your Oreos are crushed, transfer them to a medium bowl. Next, melt your 1/2 cup of butter. A quick trip to the microwave in a small, microwave-safe bowl for about 30 seconds at a time, stirring in between, will do the trick. Pour the melted butter over the Oreo crum extractbs and mix thoroughly until all the crum extractbs are moistened. You want it to look like wet sand. Press this mixture firmly into the bottom of a 9×13 inch baking dish. Use the back of a spoon or the bottom of a measuring cup to create an even layer. This crust will provide a delightful crunch that contrasts perfectly with the creamy layers to come. Pop this into the freezer for about 15-20 minutes while you prepare the next step. This chilling time will help the crust firm up and prevent it from mixing with the ice cream.
Layering the Ice Cream:
Now for the star of the show: the ice cream! We need our 1/2 gallon of vanilla ice cream to be softened, but not completely melted. Take it out of the freezer about 10-15 minutes before you’re ready to use it. You’re looking for a consistency that’s spreadable but still holds its shape. Once softened, scoop the vanilla ice cream evenly over the chilled Oreo crust. Use an offset spatula or the back of a spoon to spread it out into a smooth, even layer, all the way to the edges of the pan. Again, pop this back into the freezer for at least an hour, or until the ice cream is firm. This step is crucial for ensuring clean layers and a dessert that holds its shape when you slice it.
Crafting the Peanut & Caramel Drizzle:
This is where the magic truly happens, with a sweet and salty peanut component. We’ll use our pound of Spanish peanuts. While some recipes might suggest chopping them, I find that leaving them whole adds a fantastic textural element and a satisfying crunch in every bite. Set these aside for now. Next, we’ll make a quick, delicious caramel-like drizzle that ties everything together. In a small saucepan, combine the 12 ounces of semi-sweet chocolate chips, the 1/2 cup of butter, and the 12 ounces of evaporated milk. Place this over medium-low heat. Stir constantly, scraping the bottom of the pan to prevent sticking and burning, until the chocolate chips are completely melted and the mixture is smooth and glossy. This will create a rich, fudgy sauce. Once the sauce is smooth, remove it from the heat.
Assembling and Finishing Touches:
With our ice cream layer firm and our chocolate sauce ready, it’s time to bring it all together. Take the baking dish with the frozen ice cream layer out of the freezer. Sprinkle the Spanish peanuts evenly over the surface of the ice cream. Don’t be shy with the peanuts – they are a key part of the Buster Bar experience! Now, gently drizzle the warm chocolate sauce over the peanuts and ice cream. You can use a spoon to drizzle it in lines or swirls, or pour it more generously to cover most of the surface. The warmth of the sauce will slightly melt the top of the ice cream, allowing it to meld beautifully. Finally, sprinkle the 2 cups of powdered confectioner’s sugar evenly over the chocolate layer. This adds a final touch of sweetness and a beautiful, snowy finish.
Freezing and Serving Your Masterpiece:
Once your Buster Bar Ice Cream Dessert is fully assembled with the peanuts, chocolate drizzle, and powdered sugar, it’s time for the final freeze. Cover the baking dish tightly with plastic wrap or aluminum foil. Place it back in the freezer for at least 4-6 hours, or preferably overnight. This long freeze ensures that all the layers set up perfectly and the dessert is firm enough to slice cleanly. When you’re ready to serve, let the dessert sit at room temperature for about 5-10 minutes before cutting. This will make it easier to slice and prevent it from being rock hard. Use a sharp knife that has been dipped in hot water and dried for clean, neat slices. Enjoy this incredible homemade Buster Bar Ice Cream Dessert!
Conclusion:
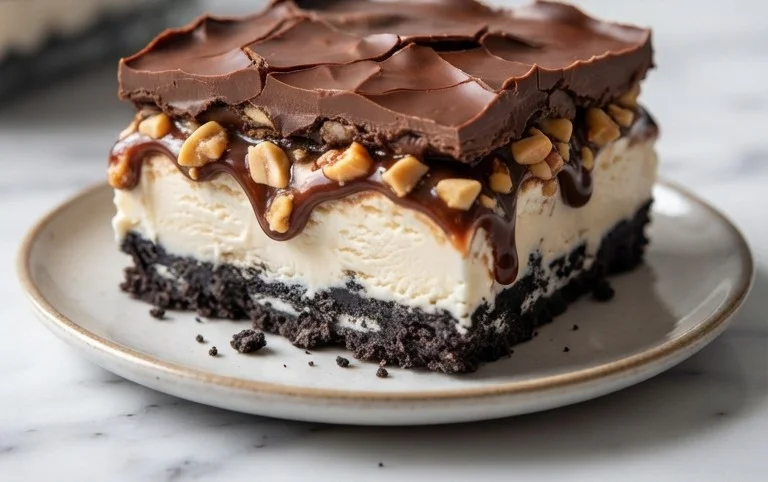
There you have it – your guide to creating an absolutely incredible Buster Bar Ice Cream Dessert! This recipe is a true winner because it captures all the nostalgic, chocolatey, peanut-buttery goodness of the classic treat in an easy-to-make, crowd-pleasing dessert. The combination of creamy ice cream, rich chocolate fudge sauce, and crunchy peanuts is simply divine. It’s the perfect centerpiece for summer gatherings, a special treat for a birthday, or just a way to bring a smile to your face after a long week. Don’t be afraid to get creative with your serving suggestions; a dollop of whipped cream or a sprinkle of extra chopped peanuts always elevates this delightful dessert.
I truly encourage you to give this Buster Bar Ice Cream Dessert recipe a try. It’s incredibly rewarding to make something so delicious from scratch, and the joy it brings to those you share it with is unparalleled. You might even discover your own favorite twist on this already fantastic dessert!
Frequently Asked Questions:
Can I make the chocolate fudge sauce ahead of time?
Absolutely! The chocolate fudge sauce can be made a day or two in advance and stored in an airtight container in the refrigerator. Gently reheat it before serving if it has solidified.
What are some other topping ideas for this Buster Bar Ice Cream Dessert?
Beyond the classic chocolate and peanuts, consider adding a drizzle of caramel sauce, some chopped toffee bits, a sprinkle of shredded coconut, or even some mini chocolate chips for extra texture and flavor. Fresh berries can also add a lovely tartness.
Is it possible to make this dessert dairy-free?
Yes! You can achieve a delicious dairy-free version by using your favorite dairy-free ice cream, a dairy-free chocolate fudge sauce recipe (often made with coconut milk or oil), and ensuring your chocolate coating is dairy-free.
Buster Bar Ice Cream Dessert
A delightful no-bake dessert featuring a crushed Oreo crust, creamy vanilla ice cream, a peanut butter crunch topping, and a chocolate drizzle. This recipe is a crowd-pleaser for all ages.
Ingredients
-
1 14.3 oz pkg. of Oreo cookies, (crushed)
-
1/2 C butter, (melted)
-
1/2 gal. vanilla ice cream, (softened)
-
1 lb. Spanish peanuts
-
2 C powdered confectioner’s sugar
-
12 oz semi sweet chocolate chips
-
1/2 C butter
-
12 oz evaporated milk
Instructions
-
Step 1
In a medium bowl, combine the crushed Oreo cookies and 1/2 cup of melted butter. Press this mixture evenly into the bottom of a 9×13 inch baking dish. -
Step 2
Spread the softened vanilla ice cream evenly over the Oreo crust. Return the dish to the freezer while you prepare the peanut topping. -
Step 3
In a separate bowl, mix together the Spanish peanuts, powdered confectioner’s sugar, and 1/2 cup of butter until well combined. -
Step 4
Remove the ice cream from the freezer and evenly sprinkle the peanut mixture over the ice cream layer. -
Step 5
In a microwave-safe bowl, melt the semi-sweet chocolate chips with the evaporated milk. Stir until smooth and pourable. -
Step 6
Drizzle the melted chocolate mixture over the peanut topping. Cover the dessert and freeze for at least 2-3 hours, or until firm. -
Step 7
Cut into squares and serve immediately.
Important Information
Nutrition Facts (Per Serving)
It is important to consider this information as approximate and not to use it as definitive health advice.
Allergy Information
Please check ingredients for potential allergens and consult a health professional if in doubt.