Cheesy Zucchini Breadsticks-Easy Savory Snack
Cheesy Zucchini Breadsticks are about to become your new favorite appetizer, snack, or even side dish. Forget everything you thought you knew about zucchini; this recipe transforms humble summer squash into something utterly irresistible. We all love a good breadstick, right? That perfect balance of soft, yielding interior and a slightly crisp, flavorful exterior. Now, imagin extracte infusing that classic comfort with the savory goodness of melted cheese and the subtle, earthy notes of fresh zucchini. That’s the magic of these Cheesy Zucchini Breadsticks! They’re incredibly easy to whip up, making them perfect for spontaneous gatherings or a weeknight treat. What truly makes them special is how they cleverly hide a healthy dose of vegetables in a package so delicious, no one will ever suspect they’re getting their greens. Get ready to impress yourself and everyone around you with this delightful creation.
Cheesy Zucchini Breadsticks
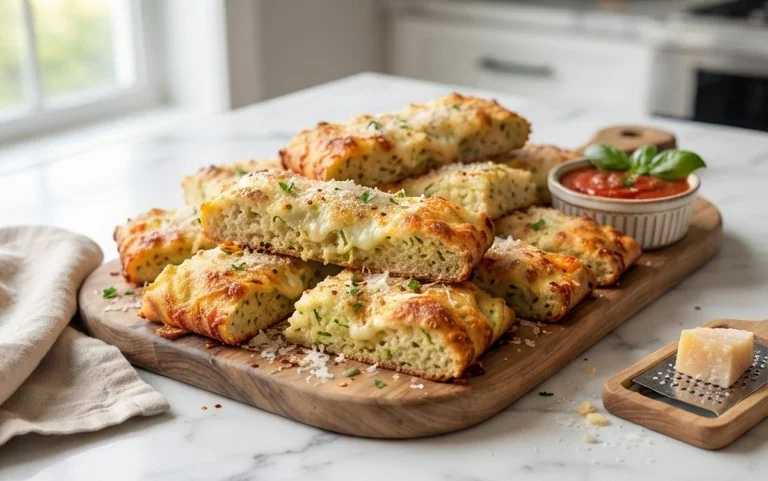
Looking for a delicious and surprisingly healthy way to enjoy zucchini? These Cheesy Zucchini Breadsticks are the answer! Forget those bland, dry breadsticks; these are packed with flavor, wonderfully cheesy, and have a delightful tender interior with a slightly crisp exterior. They’re perfect as an appetizer, a side dish for pasta or soup, or even a sneaky way to get more vegetables into your picky eaters. The beauty of these breadsticks is how versatile they are. Serve them warm with your favorite marinara sauce for dipping, or enjoy them as is. They’re surprisingly easy to make, and the fresh zucchini adds a subtle moisture and sweetness that complements the savory cheese beautifully. Let’s get started!
Ingredients:
Preparation and Mixing
The first step to creating these delightful breadsticks is preparing your zucchini. You’ll want to grate your zucchini using a box grater. The medium-sized holes usually work best. Once grated, it’s crucial to remove as much excess moisture as possible. This is a key step to prevent soggy breadsticks. You can do this by placing the grated zucchini in a clean kitchen towel or cheesecloth and squeezing out the liquid. Really give it a good squeeze – the drier the zucchini, the better the texture of your breadsticks will be. After squeezing, you should have a much more compact and less watery mass of zucchini.
Now that your zucchini is prepped, it’s time to bring everything together. In a large mixing bowl, combine the squeezed grated zucchini with the ½ cup of shredded mozzarella cheese and the ⅓ cup of finely shredded Parmesan cheese. These cheeses will melt and bind the mixture together, creating that irresistible cheesy pull. Next, crack in your large egg. The egg acts as a binder, holding all the ingredients in harmony. Add the dried Italian seasoning, which will infuse your breadsticks with aromatic herbs like oregano, basil, and thyme. Don’t forget to add the ½ teaspoon of salt for flavor enhancement and the ½ teaspoon of garlic powder for that classic savory kick.
Gently mix all the ingredients together with a spoon or your hands until everything is well combined. You want to ensure the zucchini, cheeses, and seasonings are evenly distributed throughout the mixture. The mixture might seem a bit wet, but that’s okay; the cheeses will help it come together. Once everything is mixed, you’ll add the remaining 1 cup of finely shredded mozzarella cheese. This extra mozzarella is what will give you those fantastic cheesy pockets and a lovely browned, bubbly topping. Fold this final addition of cheese into the mixture, again ensuring it’s distributed as evenly as possible.
Forming and Baking
Now that your delicious cheesy zucchini mixture is ready, it’s time to form it into breadsticks. You can do this in a couple of ways depending on your preference. For a more rustic look, you can simply spoon the mixture onto your prepared baking sheet and shape it into individual breadstick forms using your hands or the back of a spoon. Aim for a shape that’s about ½ inch thick and around 4-6 inches long.
Alternatively, for more uniform breadsticks, you can line a baking sheet with parchment paper or lightly grease it. Then, spread the entire mixture evenly across the baking sheet to form a large rectangle, about ½ inch thick. Once spread, you can use a knife or pizza cutter to score the dough into breadstick shapes. This makes it easier to separate them after baking and ensures they all cook evenly.
Baking to Golden Perfection
Preheat your oven to 400 degrees Fahrenheit (200 degrees Celsius). This is a moderate to high oven temperature, perfect for achieving a golden-brown exterior and ensuring the breadsticks cook through without becoming dry. Place your formed or scored breadsticks onto the prepared baking sheet. Make sure they are not too crowded, as this will allow them to crisp up nicely.
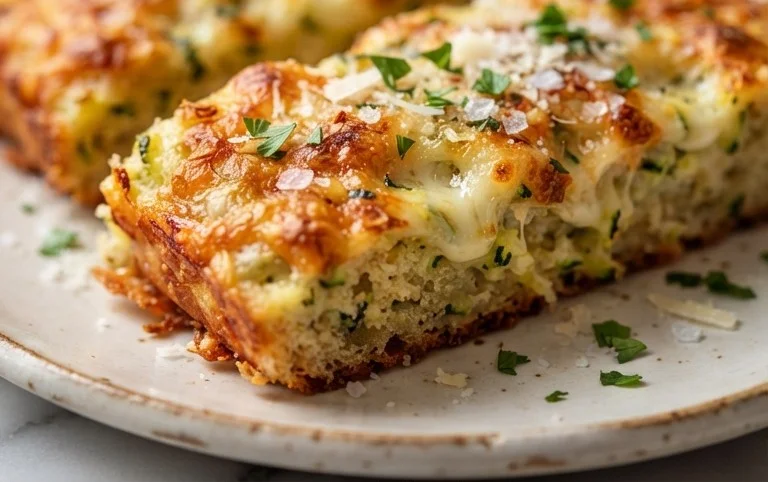
Bake for 20 to 25 minutes, or until the edges are golden brown and the cheese is melted and bubbly. Keep an eye on them during the last few minutes of baking, as oven temperatures can vary. You want them to be beautifully golden, not burnt. The aroma that will fill your kitchen during this time is absolutely incredible – a testament to the savory cheese and herbs at play.
Once baked, carefully remove the baking sheet from the oven. If you scored your breadsticks before baking, you can now easily separate them. Allow them to cool slightly on the baking sheet for a few minutes before transferring them to a wire rack. They are best enjoyed warm, but they are also delicious at room temperature. Serve them with your favorite marinara sauce for dipping, a dollop of ranch dressing, or even a side of pesto. These Cheesy Zucchini Breadsticks are sure to become a new favorite in your recipe repertoire! Enjoy every cheesy, savory bite.
Conclusion:
I hope you’re as excited to try these Cheesy Zucchini Breadsticks as I am to share them! They truly are a fantastic way to sneak some extra veggies into your diet while enjoying a delicious, crowd-pleasing snack or appetizer. The combination of tender zucchini, savory cheese, and warm spices makes them incredibly satisfying and versatile. Whether you’re looking for a healthier alternative to traditional breadsticks, a clever way to use up garden zucchini, or simply a delightful treat, these breadsticks tick all the boxes. I find they’re perfect for movie nights, game days, or even as a side dish for your favorite Italian meal.
Don’t be afraid to get creative with variations! You could add a pinch of red pepper flakes for a little heat, or try different cheeses like mozzarella and cheddar for a bolder flavor. A sprinkle of garlic powder or onion powder can also elevate the savory notes. Give them a go – I’m confident you’ll love them!
Frequently Asked Questions:
Can I make these ahead of time?
Yes, you can! You can prepare the batter and store it in the refrigerator for up to 24 hours. When you’re ready to bake, simply proceed with the recipe as instructed, though you might need to add a minute or two to the baking time. For best results, however, I find they are freshest when baked and enjoyed soon after.
How do I ensure my zucchini breadsticks aren’t soggy?
The key to avoiding soggy Cheesy Zucchini Breadsticks is to properly drain the shredded zucchini. After shredding, place it in a fine-mesh sieve and gently press out as much moisture as possible. You can even wrap it in a clean kitchen towel and squeeze to remove excess liquid. This step is crucial for achieving a good texture!
What can I serve these breadsticks with?
These breadsticks are incredibly versatile! They are wonderful served on their own as a snack. For a more substantial appetizer, pair them with your favorite marinara sauce for dipping, or a creamy pesto. They also make a fantastic side for salads or soups, and are a delicious accompaniment to pasta dishes or even grilled chicken.
Cheesy Zucchini Breadsticks
Savory and cheesy breadsticks made with grated zucchini, perfect as an appetizer or side dish.
Ingredients
-
4 cups grated zucchini (about 2 large zucchini)
-
1/2 cup shredded mozzarella cheese
-
1/3 cup finely shredded Parmesan cheese
-
1 large egg
-
1 teaspoon dried Italian seasoning
-
1/2 teaspoon salt
-
1/2 teaspoon garlic powder
-
1 cup finely shredded mozzarella cheese
Instructions
-
Step 1
Preheat your oven to 400°F (200°C) and line a baking sheet with parchment paper. -
Step 2
Squeeze out as much excess moisture as possible from the grated zucchini. This is crucial for crispy breadsticks. -
Step 3
In a medium bowl, combine the squeezed zucchini, 1/2 cup shredded mozzarella cheese, Parmesan cheese, egg, Italian seasoning, salt, and garlic powder. Mix well until all ingredients are incorporated. -
Step 4
Shape the mixture into breadstick-like forms on the prepared baking sheet. Aim for uniform thickness. -
Step 5
Sprinkle the remaining 1 cup of shredded mozzarella cheese evenly over the top of the zucchini breadsticks. -
Step 6
Bake for 20-25 minutes, or until the breadsticks are golden brown and the cheese is melted and bubbly. -
Step 7
Let cool slightly before serving. Enjoy warm!
Important Information
Nutrition Facts (Per Serving)
It is important to consider this information as approximate and not to use it as definitive health advice.
Allergy Information
Please check ingredients for potential allergens and consult a health professional if in doubt.