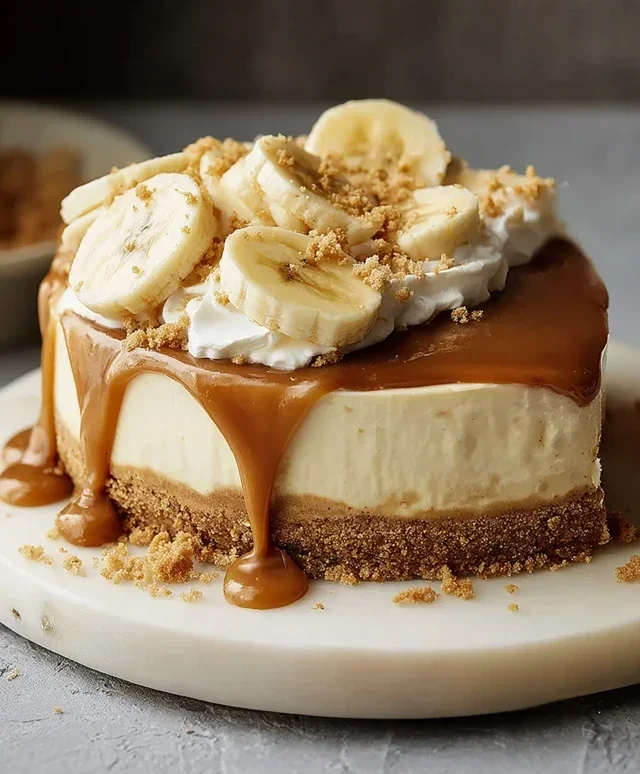
No-Bake Banoffee Cheesecake Recipe-Easy & Delicious
No-Bake Banoffee Cheesecake is the ultimate dessert indulgence, and I’m so excited to share my go-to recipe with you! Forget the oven; this glorious creation comes together with pure, unadulterated deliciousness and zero baking required. It’s a dessert that truly has it all: a buttery biscuit base, a layer of luscious caramel, perfectly ripe bananas, and a cloud of creamy, tangy cheesecake filling, all topped off with a generous swirl of whipped cream and a sprinkle of chocolate.
Why do we all fall head over heels for No-Bake Banoffee Cheesecake? It’s that perfect storm of textures and flavors – the satisfying crunch of the base, the gooey sweetness of the caramel, the fresh fruitiness of the bananas, and that wonderfully smooth, almost ethereal cheesecake. It’s the kind of dessert that makes a statement without demanding hours of your time. This particular No-Bake Banoffee Cheesecake is special because it balances each component flawlessly, ensuring no single element overpowers the others. Get ready for a symphony of taste and texture that will have everyone asking for seconds!

No-Bake Banoffee Cheesecake
Get ready to indulge in a dessert that’s pure bliss without any of the baking hassle! This No-Bake Banoffee Cheesecake is a dream come true for anyone who loves the classic combination of banana, toffee, and creamy cheesecake. It’s incredibly easy to make, requiring no oven time, making it perfect for those hot summer days or when you just want a quick and impressive treat. The secret to its silky smooth texture and rich flavour lies in the blend of dairy-free ingredients, proving that you don’t need dairy to create something utterly decadent. We’re using pre-soaked cashews to achieve that wonderfully creamy base, along with dairy-free cream cheese and coconut cream, which work harmoniously to create a luscious filling. The biscuit base adds a delightful crunch, and the generous swirls of vegan caramel sauce and fresh banana slices make each bite an explosion of banoffee perfection. Let’s get started and create this showstopper!
Ingredients:
Creating the Biscuit Base
The foundation of our banoffee cheesecake is a simple yet satisfying biscuit base. This step is crucial for providing a sturdy and flavourful contrast to the creamy filling.
1. Prepare the Biscuits: Start by crushing your plain biscuits. You can do this in a food processor until they form fine crum extractbs, or for a more rustic texture, place them in a sturdy zip-top bag and bash them with a rolling pin. If you’re using gluten-free biscuits, ensure they are also plain and have a good texture when crushed. The goal is to have crum extractbs that will bind together easily.
2. Combine with Dairy-Free Butter: Melt the dairy-free butter or margarine gently. In a medium bowl, combine the biscuit crum extractbs with the melted dairy-free butter. Stir well until all the crum extractbs are evenly coated. This mixture should resemble wet sand.
3. Press into the Tin: Lightly grease a 20cm (8-inch) springform tin. Spoon the crum extractb mixture into the tin and press it down firmly and evenly using the back of a spoon or the base of a glass. Make sure to press it right to the edges and up the sides slightly to create a neat crust. This firm packing will ensure your base doesn’t crum extractble when you slice the cheesecake. Pop this into the refrigerator to chill and set while you prepare the filling.
Crafting the Creamy Filling
This is where the magic happens! We’re using a blend of cashews and dairy-free cream cheese to achieve an incredibly smooth and decadent filling, all without any baking.
1. Prepare the Cashews: Drain and rinse the pre-soaked cashew nuts thoroughly. Discard the soaking water. Place the drained cashews into a high-powered blender or food processor. Add the dairy-free cream cheese, the thick solid part from the chilled can of coconut cream (discard the liquid or save it for another use), and the icing sugar.
2. Blend Until Silky Smooth: Blend these ingredients on high speed until the mixture is completely smooth and creamy. This may take a few minutes, and you might need to scrape down the sides of the blender a couple of times to ensure everything is incorporated. The key here is patience; the smoother the cashew mixture, the more luxurious your cheesecake filling will be. You are aiming for a consistency that is thick but still pourable.
3. Add Banana and Caramel: Peel and slice the medium-sized banana. Add about half of the sliced banana to the blender with the cashew mixture. Add a generous swirl (about 2-3 tablespoons) of vegan caramel sauce. Blend again briefly until just combined. You want some small pieces of banana and streaks of caramel for texture and visual appeal, not a completely uniform paste. If you prefer a smoother banana flavour, you can blend it all in, but leaving some texture is lovely.
Assembling and Chilling Your Masterpiece
Now it’s time to bring all the components together and let the cheesecake work its magic in the fridge.
1. Assemble the Cheesecake: Retrieve the chilled biscuit base from the refrigerator. Pour the creamy filling mixture evenly over the biscuit base. Use a spatula to spread it smoothly to the edges.
2. Swirl with Caramel: Drizzle more vegan caramel sauce over the top of the filling. Then, using a skewer or a small knife, gently swirl the caramel into the cheesecake filling. Create artistic patterns – don’t overmix, as you want distinct ribbons of caramel running through the creamy white filling. This visual element adds to the appeal of the banoffee cheesecake.
3. Chill to Perfection: Cover the cheesecake loosely with plastic wrap or foil. Refrigerate for at least 4-6 hours, or preferably overnight, to allow the cheesecake to set firmly. The longer it chills, the better it will be. This chilling time is essential for the cheesecake to firm up so you can easily slice it.
Finishing Touches and Serving
The final stage involves adding the delightful toppings that make this a true banoffee sensation.
1. Prepare Whipping Cream: Just before serving, whip the 80ml of dairy-free whipping cream until soft peaks form. Be careful not to over-whip it.
2. Decorate: Carefully remove the sides of the springform tin. Top the set cheesecake with the remaining fresh banana slices and dollops or swirls of the whipped dairy-free cream. Drizzle generously with more vegan caramel sauce. You can also sprinkle on some extra biscuit crum extractbs if you like.
3. Serve and Enjoy: Slice the No-Bake Banoffee Cheesecake with a sharp knife and serve immediately. It’s best enjoyed cold. This dessert is sure to impress your guests, or be a wonderful treat for yourself!
Conclusion:
And there you have it – the ultimate guide to creating a sensational No-Bake Banoffee Cheesecake! This recipe truly is a winner because it delivers all the decadent flavors of a traditional banoffee pie and a rich cheesecake, without any of the fuss or oven time. Imagin extracte a buttery biscuit base, topped with a luscious toffee layer, perfectly ripe bananas, and a cloud of whipped cream. It’s incredibly satisfying and surprisingly easy to whip up, making it perfect for last-minute gatherings or simply treating yourself.
To elevate your experience, consider serving slices of this delightful No-Bake Banoffee Cheesecake with a drizzle of extra toffee sauce or a sprinkle of grated chocolate. For those who love to experiment, why not try adding a pinch of sea salt to the toffee for a salted caramel twist, or incorporating a splash of rum extract into the whipped cream for an adult-friendly indulgence? Don’t be afraid to get creative! I truly encourage you to give this recipe a go; you won’t be disappointed with the delicious results.
Frequently Asked Questions:
Can I make this cheesecake ahead of time?
Absolutely! In fact, it’s best to make this No-Bake Banoffee Cheesecake at least 4-6 hours, or even the night before, you plan to serve it. This allows the flavors to meld beautifully and the cheesecake to set up perfectly in the refrigerator. Just add the fresh bananas and whipped cream just before serving to keep them at their freshest.
What kind of biscuits are best for the base?
Digestive biscuits are the classic choice and work wonderfully for this recipe, offering a slightly sweet and crum extractbly texture. However, you can also use Grabeef ham crackers, Hobnobs, or even gin extractgernut biscuits for a spicier kick!
How long will the cheesecake keep in the fridge?
Once assembled (with the bananas added), the No-Bake Banoffee Cheesecake is best enjoyed within 2-3 days. Keep it tightly covered in the refrigerator to maintain its freshness and prevent it from absorbing other odors.
No-Bake Banoffee Cheesecake
A decadent no-bake cheesecake layered with biscuit base, creamy cashew filling, banana, and vegan caramel sauce.
Ingredients
-
200g plain biscuits (use gluten-free biscuits if required)
-
100g dairy-free butter or margarine
-
140g cashew nuts (pre-soaked in warm water overnight)
-
340g dairy-free cream cheese
-
50g coconut cream
-
80g icing sugar
-
1 medium-sized banana
-
Vegan caramel sauce
-
Fresh banana slices
-
80ml dairy-free whipping cream
Instructions
-
Step 1
Crush the plain biscuits (or gluten-free biscuits) into fine crumbs. Melt the dairy-free butter or margarine and mix with the biscuit crumbs until well combined. -
Step 2
Press the biscuit mixture evenly into the base of a springform cheesecake tin. Chill in the refrigerator while preparing the filling. -
Step 3
Drain the soaked cashew nuts. Place them in a high-powered blender with the dairy-free cream cheese, coconut cream, and icing sugar. Blend until completely smooth and creamy. -
Step 4
Mash one medium-sized banana and spread it over the chilled biscuit base. Pour the cashew cream mixture over the banana layer and smooth the top. -
Step 5
Drizzle a generous amount of vegan caramel sauce over the cheesecake filling. Decorate with fresh banana slices and more caramel sauce. -
Step 6
Whip the dairy-free whipping cream until soft peaks form. Dollop or pipe the whipped cream around the edges of the cheesecake for decoration. -
Step 7
Chill the cheesecake in the refrigerator for at least 4 hours, or until firm, before serving.
Important Information
Nutrition Facts (Per Serving)
It is important to consider this information as approximate and not to use it as definitive health advice.
Allergy Information
Please check ingredients for potential allergens and consult a health professional if in doubt.