Gluten-Free Vegan Sweet Potato Tortillas
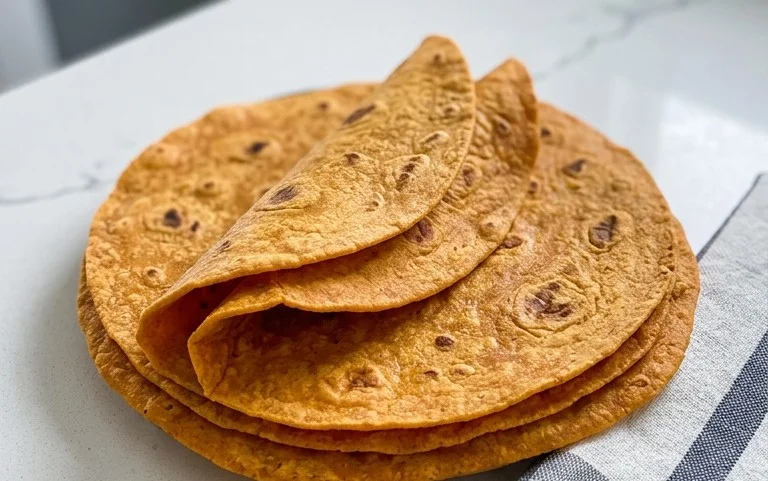
Sweet Potato Tortillas (Gluten-Free Vegan Wraps) are about to become your new go-to for quick, healthy, and incredibly satisfying meals. Forget those bland, store-bought wraps that fall apart at the first bite; these homemade delights are a game-changer! We all crave delicious, versatile options that cater to dietary needs without sacrificing flavor, and that’s precisely where these vibrant sweet potato tortillas shine. Their naturally sweet, earthy flavor pairs beautifully with everything from savory fillings to fresh salsa, making them perfect for breakfast burritos, lunch wraps, or even a light dinner. What truly makes these sweet potato tortillas special is their incredible softness and pliability, thanks to the natural magic of sweet potatoes. They’re not only gluten-free and vegan but also packed with nutrients, offering a wholesome base for all your culinary adventures. Get ready to elevate your wrap game!
Sweet Potato Tortillas (Gluten-Free Vegan Wraps)
Get ready to elevate your wrap game with these incredibly delicious and surprisingly easy Sweet Potato Tortillas! If you’re looking for a gluten-free and vegan option that’s bursting with flavor and has a wonderfully pliable texture, you’ve come to the right place. These aren’t your average bland gluten-free wraps; the natural sweetness of the sweet potato, combined with savory spices, creates a truly satisfying base for any of your favorite fillings. Whether you’re a seasoned gluten-free baker or just dipping your toes into plant-based cooking, these tortillas are a fantastic starting point. They’re perfect for breakfast burritos, veggie wraps, or even as a healthier pizza base. The vibrant orange hue is also a feast for the eyes!
Ingredients:
Getting Started: Preparing Your Sweet Potato Base
The foundation of these amazing tortillas lies in perfectly prepared sweet potato. You want to ensure your sweet potatoes are cooked until very tender, but crucially, without any added water. Steaming or boiling them in their skins is the best approach. Once cooked, let them cool slightly so they’re easier to handle. Then, peel them (the skins should slip off easily) and mash them thoroughly until you have a smooth, lump-free puree. You can use a potato masher, a fork, or even a food processor for this step. The smoother the puree, the more uniform your tortillas will be. We’re aiming for about 1 cup of mashed sweet potato. If you find your mashed sweet potato is a little too wet, you can gently cook it in a non-stick pan over low heat for a few minutes to evaporate any excess moisture. This is important because too much liquid can make your dough sticky and difficult to work with.
Next, in a large mixing bowl, combine your smooth sweet potato puree with the vegan butter. If you’re using oil, a neutral-tasting one like avocado or sunflower oil would work well. If you happen to have vegan ghee, that’s another excellent option for richness. Gently mix these together until the butter is mostly incorporated. This step adds a lovely richness and helps with the texture of the final tortilla.
Building the Dough: Bringin extractg it All Together
Now it’s time to bring in the other essential components. To the sweet potato and butter mixture, add the sea salt, a good dash of black pepper, the onion powder, and the garlic powder. These spices are key to giving our tortillas a savory depth that complements the sweet potato beautifully. Stir everything together until well combined.
This is where the magic of gluten-free baking really comes into play. We’ll be using a gluten-free sourdough starter. If you don’t have a gluten-free sourdough starter, don’t worry! You can substitute it with 3/4 cup of unsweetened, plain plant-based yogurt (like coconut or soy) mixed with 1 teaspoon of apple cider vinegar. Let it sit for about 5 minutes until it slightly curdles, then proceed. The starter (or its substitute) adds a fantastic tang and helps with the leavening and texture. Add your 3/4 cup of gluten-free sourdough starter to the bowl.
Next, it’s time to incorporate the psyllium husk. Psyllium husk is a fantastic binder for gluten-free recipes; it absorbs liquid and creates a gel-like substance that mimics the elasticity of gluten. Sprinkle in the 2 teaspoons of psyllium husk and stir it into the wet ingredients. You’ll notice the mixture starting to thicken almost immediately. Give it a good stir to ensure there are no dry pockets of psyllium husk.
Now, we’ll add our flour. Start with 2 tablespoons of arrowroot flour (or your chosen starchy flour). Arrowroot flour is light and contributes to a tender texture. You can also use tapioca starch or even a gluten-free all-purpose flour blend that doesn’t contain xanthan gum. Mix this in. If the dough still feels very wet and sticky, add the remaining tablespoon of arrowroot flour. We’re aiming for a dough that is still slightly tacky but manageable.
Finally, if you’re looking for a little extra lift and fluffiness in your tortillas, you can add the 1/2 teaspoon of baking powder. This is entirely optional, but it can give your tortillas a slightly puffier texture, which is quite delightful. Mix this in thoroughly.
Shaping and Cooking Your Perfect Tortillas
The dough might feel a bit sticky at this stage, which is perfectly normal for gluten-free doughs. It’s best to work with slightly damp or lightly floured hands or use a spatula to bring everything together into a cohesive ball. Once you have a soft, unified dough, cover the bowl and let it rest for about 10-15 minutes. This resting period allows the psyllium husk to fully hydrate and makes the dough easier to handle.
After resting, it’s time to form our tortillas. Lightly dust your work surface with a little arrowroot flour. You can also place a sheet of parchment paper down, which makes cleanup a breeze. Divide the dough into 4-6 equal portions, depending on how large you want your tortillas to be. Roll each portion into a ball.
Now, let’s get shaping! You can use a tortilla press if you have one, or a rolling pin. If using a rolling pin, place one dough ball between two sheets of parchment paper. Gently roll it out into a thin, round circle, about 6-8 inches in diameter. Aim for an even thickness. If the dough sticks, add a tiny bit more flour or a very light mist of water to your rolling pin or parchment paper. Be patient; gluten-free dough can be a bit more delicate than traditional dough.
Cooking to Golden Perfection
Heat a lightly oiled non-stick skillet or griddle over medium heat. You don’t need a lot of oil; just enough to prevent sticking. Once the skillet is hot, carefully transfer one of your rolled-out tortillas to the pan.
Cook for about 2-3 minutes per side, or until golden brown spots appear and the tortilla is cooked through. You’ll see small bubbles forming on the surface, which is a good sign. Flip it over and cook the other side for another 2-3 minutes. The exact cooking time will vary depending on your stove and pan. Avoid overcooking, which can make them brittle.
As each tortilla finishes cooking, stack them on a plate and cover them with a clean kitchen towel or a piece of foil. This helps to keep them warm and steamy, ensuring they remain soft and pliable for your fillings. Repeat this process with the remaining dough balls.
These Sweet Potato Tortillas are best enjoyed fresh, but they can also be stored in an airtight container in the refrigerator for 2-3 days. You can gently reheat them in a dry skillet or a low oven before serving. Enjoy your delicious, homemade, gluten-free, vegan wraps!
Conclusion:
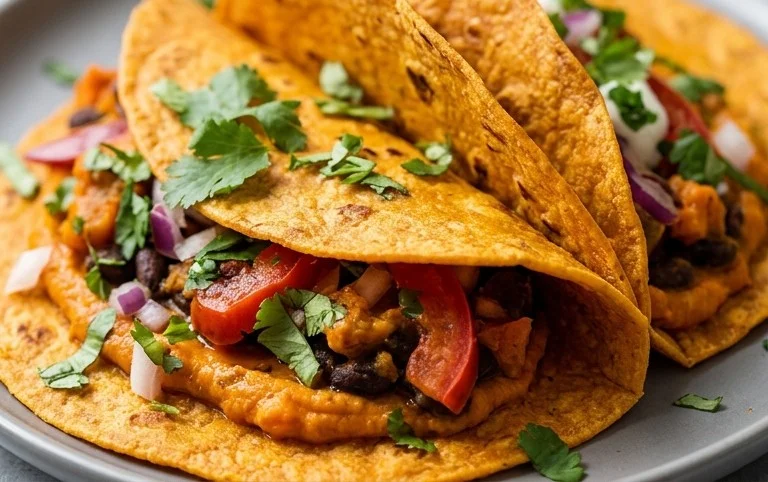
I hope you’re as excited to try these Sweet Potato Tortillas (Gluten-Free Vegan Wraps) as I am to share them! These versatile wraps are a game-changer for anyone looking for delicious, healthy, and inclusive meal options. Their natural sweetness from the sweet potato, coupled with their soft and pliable texture, makes them a perfect base for a wide array of fillings. They’re fantastic for quick lunches, satisfying dinners, or even as a creative appetizer base. I encourage you to experiment with different flavors and fillings – the possibilities are truly endless!
Think vibrant veggie fillings, hearty lentil stews, spicy black bean mixtures, or even sweet applications like cinnamon-spiced apple slices. For variations, you can infuse the dough with herbs like cilantro or parsley, or add a pinch of smoked paprika for a subtle smoky note. Don’t be afraid to get creative! Making these Sweet Potato Tortillas yourself is incredibly rewarding, and you’ll be amazed at how easy they are to whip up. Give them a try, and you’ll discover a new favorite staple in your kitchen!
Frequently Asked Questions:
Q: Can I make these sweet potato tortillas ahead of time?
Absolutely! Once cooled, store your sweet potato tortillas in an airtight container or a resealable bag at room temperature for up to 2 days, or in the refrigerator for up to 5 days. You can also freeze them for longer storage; just ensure they are completely cool before freezing, and separate them with parchment paper to prevent sticking. Reheat gently in a dry skillet or microwave before serving.
Q: What kind of flour should I use for these gluten-free vegan wraps?
For the best results, I recommend using a good quality gluten-free all-purpose flour blend that contains xanthan gum. If your blend doesn’t have xanthan gum, you may want to add about 1/2 teaspoon to the dry ingredients to help with binding and elasticity. Experimenting with different gluten-free flours can yield slightly different textures, so feel free to find your favorite!
Sweet Potato Tortillas (Gluten-Free Vegan Wraps)
Deliciously soft and pliable gluten-free vegan wraps made with sweet potato, perfect for any filling.
Ingredients
-
2 small sweet potatoes – steamed or boiled (no liquid / mashed)
-
2 tbsp vegan butter
-
1-2 tbsp hot water
-
3/4 tsp sea salt
-
1/4 tsp black pepper
-
1/2 tsp onion powder
-
1/2 tsp garlic powder
-
3/4 cup gluten free sourdough starter
-
2 tsp psyllium husk
-
2-3 tbsp arrowroot flour
-
1/2 tsp baking powder
Instructions
-
Step 1
Mash the steamed or boiled sweet potatoes until smooth. Ensure there is no excess liquid. -
Step 2
In a bowl, combine the mashed sweet potato, vegan butter, hot water, sea salt, black pepper, onion powder, and garlic powder. Mix well. -
Step 3
Add the gluten free sourdough starter and psyllium husk to the wet ingredients. Stir until combined. -
Step 4
Gradually add the arrowroot flour and baking powder (if using), mixing until a dough forms. Adjust flour as needed for consistency. -
Step 5
Knead the dough for a few minutes until smooth. Let it rest for about 10-15 minutes. -
Step 6
Divide the dough into equal portions and roll each into a ball. Flatten each ball into a thin tortilla using a rolling pin or tortilla press. You can also flatten them between two sheets of parchment paper. -
Step 7
Cook the tortillas on a lightly oiled griddle or skillet over medium heat for 2-3 minutes per side, until lightly browned and cooked through.
Important Information
Nutrition Facts (Per Serving)
It is important to consider this information as approximate and not to use it as definitive health advice.
Allergy Information
Please check ingredients for potential allergens and consult a health professional if in doubt.