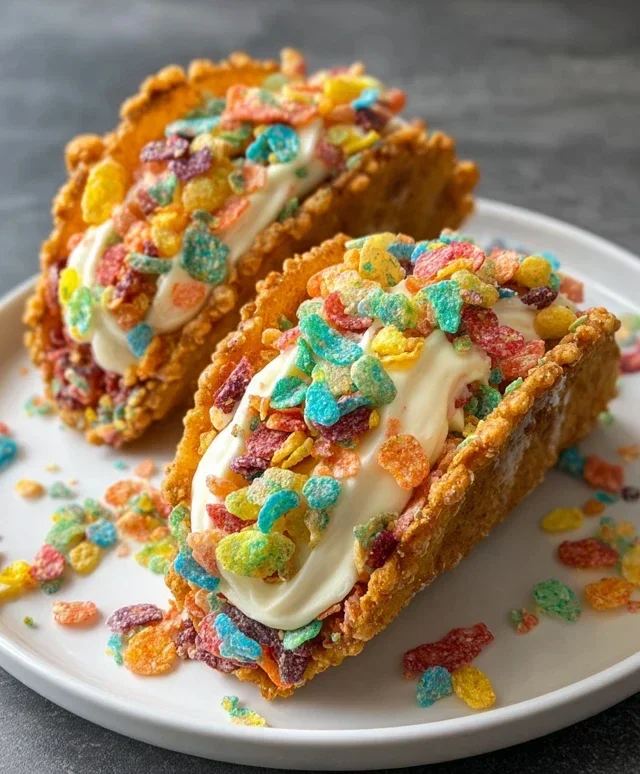
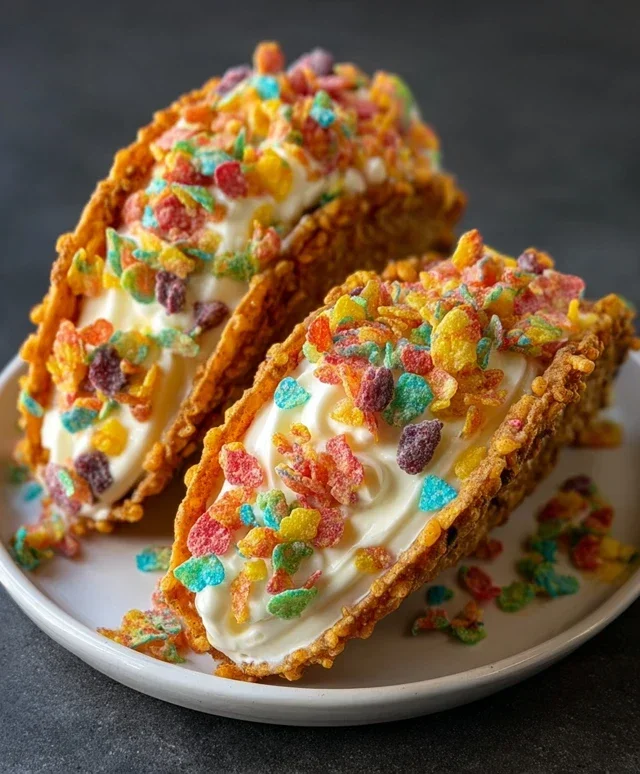
Fruity Pebbles Cheesecake Tacos-Sweet Delight
Fruity Pebbles Cheesecake Tacos are here to revolutionize your dessert game, and trust me, you’re going to want in on this magic. Imagin extracte the creamy, dreamy indulgence of classic cheesecake, but transformed into an unbelievably fun and portable treat. These aren’t your grandma’s cheesecake; they’re a vibrant explosion of color and flavor that captures the nostalgic joy of childhood cereal and the sophisticated delight of a perfectly baked cheesecake. We’re talking about a crispy, taco-shaped shell (yes, really!), bursting with a sweet, tangy cheesecake filling, and then generously showered with the unmistakable crunch and fruity punch of Fruity Pebbles. It’s the perfect fusion of playful and decadent, making them an instant crowd-pleaser for parties, a fun weekend project for the family, or just a delightful way to treat yourself. Get ready to fall head over heels for these incredible Fruity Pebbles Cheesecake Tacos!
Fruity Pebbles Cheesecake Tacos
Get ready to experience a burst of flavor and fun with these incredible Fruity Pebbles Cheesecake Tacos! This recipe takes the beloved creamy goodness of cheesecake and transforms it into a playful, handheld treat. Imagin extracte a crunchy, vibrant shell made from Fruity Pebbles, cradling a luscious, sweet cheesecake filling, all topped with fluffy whipped cream and even more cereal for that extra pop. These are perfect for a party, a fun family dessert, or whenever you’re craving something a little out of the ordinary and utterly delicious. We’re using simple ingredients to create something truly spectacular, so let’s dive in!
Ingredients:
Creating the Crunchy Taco Shells
The foundation of our Fruity Pebbles Cheesecake Tacos is the shell, and we’re making it from scratch with the star ingredient: Fruity Pebbles! This is where the magic begin extracts, transforming ordinary cereal into a delightful, edible vessel for our cheesecake.
1. In a medium bowl, combine the 3 cups of colorful fruity cereal with the 1/2 cup of melted unsalted butter. You want to ensure that every single piece of cereal is coated in the melted butter. This is crucial for binding the cereal together and creating a sturdy, crunchy shell. Gently stir with a spatula or spoon until the cereal is evenly moistened. Don’t be afraid to get in there and mix it well; we want that buttery goodness to permeate the cereal.
2. Now, we’ll form our taco shells. This is the fun part! You’ll need a way to shape them. Taco shell molds are ideal, but you can also get creative. If you have taco shell molds, grease them lightly. Press the buttered cereal mixture firmly into the molds, ensuring an even thickness along the bottom and sides. The key here is to pack it down really well. The tighter you pack it, the more structurally sound your shells will be. If you don’t have molds, you can use a small, oven-safe bowl or ramekin lined with parchment paper, pressing the mixture into the bottom and up the sides to create a cup shape. Another option is to press the mixture onto the underside of muffin tin cups, creating a curved shell as it bakes. Whichever method you choose, aim for a shell that’s about 1/4 inch thick.
3. Once your shells are formed in their molds or shapes, it’s time to bake them. Preheat your oven to 350°F (175°C). Carefully place your molds or shaped cereal mixtures onto a baking sheet. Bake for about 8-10 minutes, or until the edges are lightly golden and the shells feel firm to the touch. Keep a close eye on them, as cereal can burn quickly. The butter will help them set and become wonderfully crisp. After baking, remove them from the oven and let them cool completely in their molds or on the baking sheet. This cooling process is vital for them to harden up and become crisp. Resist the urge to touch them while they’re hot – patience is key for perfectly crisp shells! Once completely cool, gently remove them from their molds.
Whipping Up the Creamy Cheesecake Filling
While our taco shells are cooling and firming up, we’ll prepare the decadent cheesecake filling that makes these tacos truly special. This filling is smooth, creamy, and perfectly sweet, a delightful contrast to the crunchy cereal shell.
4. In a separate, clean bowl, beat the 8 oz of softened cream cheese until it’s completely smooth and free of lumps. Using softened cream cheese is non-negotiable for a silky-smooth filling. If your cream cheese is still cold, it will be difficult to get a lump-free texture. Next, gradually add the 1/2 cup of sifted powdered sugar to the cream cheese, continuing to beat until well combined and airy. Sifting the powdered sugar helps prevent any grittiness in your filling. Finally, stir in the 1 tsp of pure vanilla extract. The vanilla adds a wonderful depth of flavor that complements the sweetness of the cereal and cream cheese. You want a luscious, thick, yet spreadable consistency.
Assembling Your Fruity Pebbles Cheesecake Tacos
Now for the most exciting part – bringin extractg it all together! The assembly is quick and easy, and the results are visually stunning and incredibly delicious.
5. Once your Fruity Pebbles taco shells are completely cool and firm, it’s time to fill them. Gently spoon or pipe the creamy cheesecake filling into each of the cooled cereal shells. Don’t overfill them; you want to leave a little room for the whipped cream. Now, dollop a generous amount of the 1 cup of whipped cream on top of the cheesecake filling in each taco. For the final flourish, sprinkle additional colorful fruity cereal over the whipped cream for that extra crunch and a burst of vibrant color. You can be as generous or as light with the garnish as you like! These tacos are best enjoyed immediately after assembly to ensure the shells remain as crisp as possible, but they can also be chilled for a short period. Get ready to wow your taste buds with this fun, flavorful, and unforgettable dessert!
Conclusion:
There you have it! A truly show-stopping treat that’s as fun to make as it is to devour: Fruity Pebbles Cheesecake Tacos. This recipe is a winner because it perfectly balances the creamy, tangy goodness of cheesecake with the delightful crunch and vibrant flavor of Fruity Pebbles, all nestled within a crispy taco shell. It’s a guaranteed crowd-pleaser and a fantastic way to add a playful twist to dessert.
These cheesecake tacos are incredibly versatile. For a party, serve them as a delightful dessert station, letting everyone customize their own. They’re also a perfect treat for a special occasion, a fun weekend project with family, or even a unique dessert after a casual weeknight meal. Don’t hesitate to get creative with your toppings! Beyond the classic Fruity Pebbles, consider adding fresh berries like strawberries or blueberries, a drizzle of white chocolate sauce, or even a dollop of whipped cream. For a different textural experience, you could even try folding a little into the cheesecake filling itself! I highly encourage you to give this recipe a try – it’s a burst of flavor and joy in every bite!
Frequently Asked Questions:
Can I make the taco shells ahead of time?
Yes, absolutely! You can prepare and bake the taco shells a day in advance. Store them in an airtight container at room temperature to maintain their crispiness. Just be sure they are completely cooled before storing to prevent any steaming, which can make them soggy.
What if I don’t have Fruity Pebbles cereal?
No worries! While Fruity Pebbles are key to the signature look and taste, you can substitute other colorful, crunchy breakfast cereals. Consider brands like Trix, Cinnamon Toast Crunch (for a different flavor profile), or even a mix of your favorite colorful cereals. The goal is to get that fun visual appeal and satisfying crunch!
Fruity Pebbles Cheesecake Tacos
A fun and colorful dessert combining the crunch of cereal with creamy cheesecake filling, all served in a taco shell.
Ingredients
-
3 cups colorful fruity cereal
-
1/2 cup unsalted butter, melted
-
8 oz cream cheese, softened
-
1/2 cup powdered sugar, sifted
-
1 tsp pure vanilla extract
-
1 cup whipped cream
-
Additional fruity cereal for garnish
Instructions
-
Step 1
Crush 3 cups of colorful fruity cereal into fine crumbs. You can use a food processor or place the cereal in a bag and crush it with a rolling pin. -
Step 2
In a bowl, combine the cereal crumbs with 1/2 cup melted unsalted butter. Mix until well combined. Press this mixture evenly into taco-shaped molds or on a parchment-lined baking sheet to form taco shells. Chill for at least 30 minutes to firm up. -
Step 3
In a separate bowl, beat 8 oz softened cream cheese with 1/2 cup sifted powdered sugar until smooth and creamy. -
Step 4
Stir in 1 tsp pure vanilla extract into the cream cheese mixture. Gently fold in 1 cup of whipped cream until no streaks remain. -
Step 5
Spoon or pipe the cheesecake filling into the chilled cereal taco shells. -
Step 6
Garnish the tops of the cheesecake tacos with additional fruity cereal.
Important Information
Nutrition Facts (Per Serving)
It is important to consider this information as approximate and not to use it as definitive health advice.
Allergy Information
Please check ingredients for potential allergens and consult a health professional if in doubt.