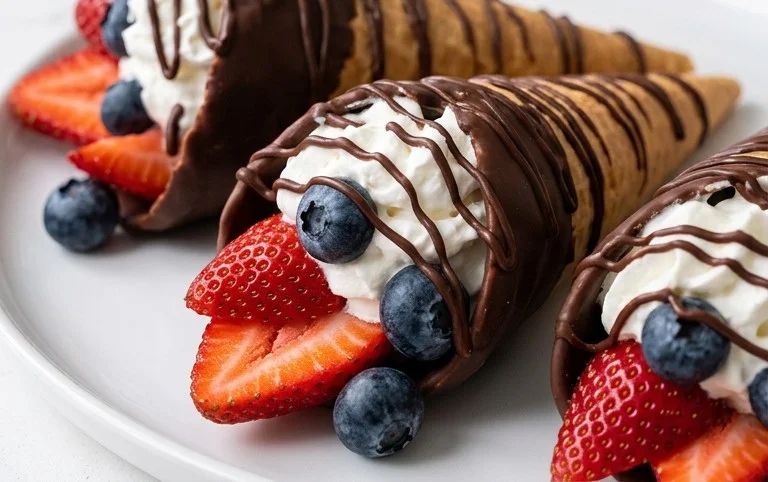
Chocolate Dipped Fruit Cones – Decadent Easy Dessert
Chocolate Dipped Fruit Filled Cones are more than just a dessert; they’re a delightful invitation to pure joy, a handheld celebration of textures and tastes that will make your taste buds sing. Imagin extracte the crisp, sweet crunch of a golden waffle cone giving way to a luscious, vibrant fruit filling, all enveloped in a decadent cloak of rich, melting chocolate. It’s this exquisite contrast, this symphony of sensations, that makes chocolate dipped fruit filled cones utterly irresistible. We adore them because they capture the essence of pure, unadulterated happiness in every bite. Whether you’re craving a refreshing burst of berries or the tropical sweetness of mango, the possibilities are endless, making these chocolate dipped fruit filled cones a truly customizable and unforgettable treat for any occasion. Get ready to discover your new favorite way to indulge!

Chocolate Dipped Fruit Filled Cones
Get ready to impress your friends and family with these delightful Chocolate Dipped Fruit Filled Cones! They look so fancy, but I promise, they’re surprisingly easy to make. Imagin extracte the satisfying crunch of a waffle cone, giving way to a creamy, luscious filling, all encased in a shell of rich, decadent chocolate. It’s a dessert that hits all the right notes – sweet, fruity, chocolatey, and wonderfully textural. Perfect for parties, a special treat, or just when you need a little bit of joy in your day.
This recipe uses simple, readily available ingredients, and the process is broken down into manageable steps. We’ll be making a quick, no-bake fruit filling and then getting our hands (or at least our spoons) a little chocolatey.
Ingredients:
Preparing the Creamy Fruit Filling
The base of our delicious filling is a simple, yet incredibly satisfying, sweetened cream cheese mixture. It’s light and airy from the whipped cream, with just the right amount of tang from the cream cheese and sweetness from the powdered sugar.
1. In a medium bowl, whip the heavy whipping cream using an electric mixer on medium-high speed until stiff peaks form. This means when you lift the beaters, the cream holds its shape. Be careful not to over-whip, or you’ll end up with butter! Once you achieve those beautiful stiff peaks, set the whipped cream aside.
2. In a separate large bowl, beat the softened cream cheese with the powdered sugar and vanilla extract until it’s completely smooth and well combined. There should be no lumps of cream cheese remaining. If your cream cheese isn’t fully softened, it can be a bit lumpy, so a good beat is essential here. This is where that smooth, decadent texture starts to form.
3. Gently fold the whipped cream into the cream cheese mixture. You want to do this in two additions, using a spatula. Start by folding in about a third of the whipped cream to lighten the cream cheese base, then add the remaining whipped cream and fold until just combined. Overmixing at this stage can deflate the whipped cream, resulting in a denser filling. The goal is a light, fluffy, and airy consistency.
4. Now it’s time to add our beautiful fresh berries. Gently stir in the chopped fresh berries into the cream mixture. Make sure they are evenly distributed throughout the filling. If you’re using larger strawberries, chopping them into bite-sized pieces will make it easier to eat and ensure you get a burst of fruity flavor in every bite. For smaller berries like raspberries and blueberries, you can leave them whole.
Assembling the Cones
This is where the magic starts to happen! We’ll be carefully filling our cones and then moving on to the chocolate dipping.
5. Carefully spoon the fruit and cream cheese filling into each waffle cone. Fill them generously, but try not to overstuff them so much that the filling spills out the top before you dip them in chocolate. You can use a spoon or a piping bag if you have one. If using a piping bag, a large round tip works well. Gently tap the bottom of each filled cone on the counter a few times to help settle the filling and minimize air pockets, ensuring a solid filling.
Dipping in Chocolate
This is the showstopper part! The melted chocolate will create a beautiful, protective shell around our fruity filling.
6. In a microwave-safe bowl, combine the semi-sweet chocolate chips and the optional coconut oil. Microwave in 30-second intervals, stirring well after each interval, until the chocolate is completely melted and smooth. Alternatively, you can melt the chocolate using a double boiler method. The coconut oil helps to make the chocolate smoother and gives it a lovely sheen, but it’s not strictly necessary if you don’t have it. Be patient during this process; melted chocolate can scorch easily if microwaved for too long or on too high a power. Stirring is key to even melting.
7. Once your chocolate is smooth and melted, hold a filled cone by the rim and carefully dip the top half into the melted chocolate, rotating it to ensure it’s evenly coated. You can use a spoon to help smooth out any drips or uneven patches. Work quickly, as the chocolate will start to set as it cools. I find it easiest to dip about two-thirds of the way down the cone, leaving a little bit of the creamy filling visible at the very top for a peek of what’s inside.
8. Place the chocolate-dipped cones onto a baking sheet lined with parchment paper. The parchment paper will prevent the cones from sticking as the chocolate hardens. If you want to add any extra decorations, now is the time! You could sprinkle them with a few extra chopped berries, some colorful sprinkles, or even a drizzle of white chocolate before the semi-sweet chocolate fully sets.
9. Allow the chocolate to harden completely. This usually takes about 15-20 minutes at room temperature, or you can speed up the process by placing the baking sheet in the refrigerator for about 10-15 minutes. Once the chocolate shell is firm to the touch, your Chocolate Dipped Fruit Filled Cones are ready to be enjoyed! They are best served the same day they are made for the freshest taste and best texture.
These cones are a delightful treat that’s sure to impress. The combination of creamy, fruity filling and rich chocolate is simply irresistible. Enjoy!
Conclusion:
And there you have it – your guide to creating these delightful Chocolate Dipped Fruit Filled Cones! This recipe truly is a winner because it’s incredibly versatile, visually stunning, and offers a perfect balance of sweet, tangy, and chocolatey goodness. Whether you’re looking for a show-stopping dessert for a party, a fun activity to do with kids, or just a special treat for yourself, these cones deliver on all fronts. I absolutely love how easy it is to customize them to suit any occasion or preference. Don’t be afraid to get creative with your fillings and toppings!
For serving, imagin extracte these at a summer barbecue, a birthday celebration, or even as a unique dessert after a cozy dinner. They’re individual portions of joy! Some of my favorite variations include using a mix of berries, adding a sprinkle of chopped nuts on top of the chocolate, or even drizzling a contrasting color of melted chocolate for extra flair. The possibilities are truly endless, making each cone a personal masterpiece. I genuinely encourage you to give this Chocolate Dipped Fruit Filled Cones recipe a try – I promise you won’t be disappointed. It’s a wonderfully rewarding baking project.
Frequently Asked Questions:
Can I make these cones ahead of time?
Yes, you absolutely can! I recommend making them a few hours in advance, at most a day. Store them in an airtight container in the refrigerator to prevent the chocolate from softening and the fruit from becoming too wet. Just be aware that the longer they sit, the softer the cone might become from the fruit’s moisture.
What kind of chocolate is best for dipping?
For the best results and a smooth, glossy finish, I prefer using good quality melting chocolate or chocolate specifically designed for dipping. You can also use good quality semi-sweet or dark chocolate chips and add a tablespoon of coconut oil or vegetable shortening to help them melt more smoothly. Milk chocolate also works wonderfully!
Can I use different fruits besides the ones suggested?
Absolutely! This is where you can really have fun. Other fruits that work beautifully include diced peaches, mango, kiwi, or even maraschino cherries (though be sure to pat them very dry). Just make sure the fruit pieces are bite-sized and not too watery.
Chocolate Dipped Fruit Filled Cones
Deliciously sweet and refreshing cones filled with fresh fruit and dipped in rich chocolate.
Ingredients
-
1 cup heavy cream
-
1/4 cup granulated sugar
-
1 teaspoon vanilla extract
-
1/2 cup assorted fresh fruit, diced (e.g., strawberries, bananas, blueberries)
-
1 cup semi-sweet chocolate chips
-
1 tablespoon coconut oil
Instructions
-
Step 1
Whip the heavy cream and granulated sugar in a bowl until stiff peaks form. -
Step 2
Gently fold in the vanilla extract and diced fresh fruit. -
Step 3
Melt the semi-sweet chocolate chips and coconut oil in a microwave-safe bowl, stirring every 30 seconds until smooth. -
Step 4
Carefully fill the cones with the fruit and cream mixture. -
Step 5
Dip the filled cones into the melted chocolate, coating the top half. -
Step 6
Place the dipped cones on a parchment-lined baking sheet and refrigerate for at least 15 minutes, or until the chocolate is set.
Important Information
Nutrition Facts (Per Serving)
It is important to consider this information as approximate and not to use it as definitive health advice.
Allergy Information
Please check ingredients for potential allergens and consult a health professional if in doubt.