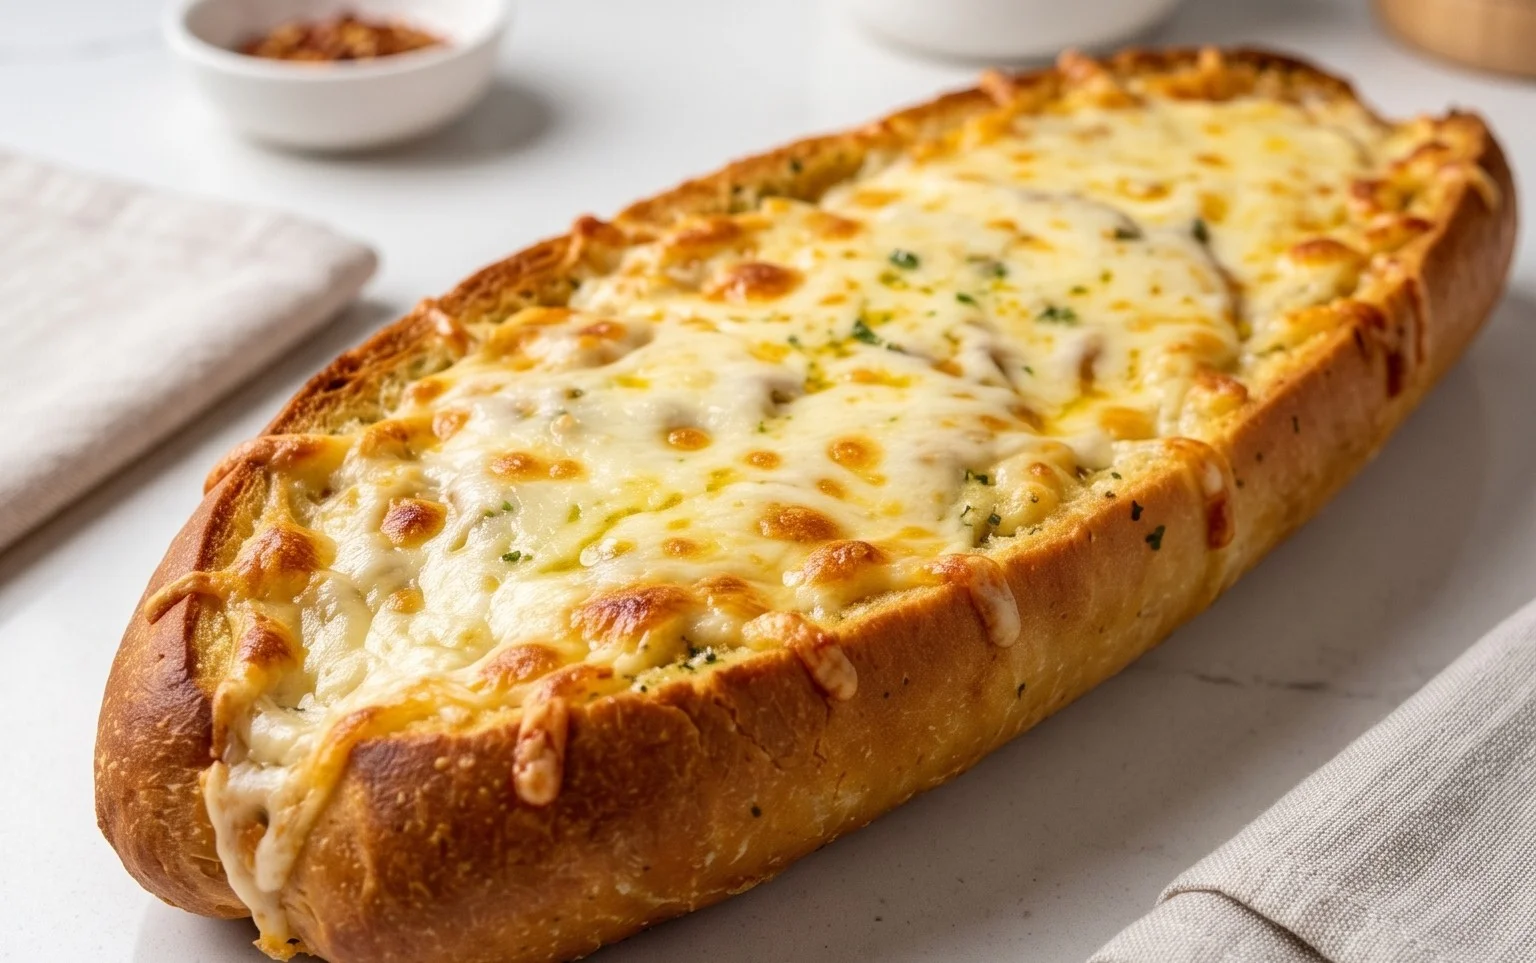
Best Cheesy Garlic Bread-Easy Homemade Recipe
BEST CHEESY GARLIC BREAD RECIPE: Prepare yourselves, fellow carb lovers and cheese aficionados, because we are about to embark on a culinary journey that will redefine your understanding of comfort food. This isn’t just any garlic bread; this is the pinnacle, the zenith, the absolute BEST CHEESY GARLIC BREAD RECIPE you will ever have the pleasure of making and devouring. Why does it deserve such a grand title? Because it hits every single spot. It’s that irresistible, golden-brown, crispy-on-the-outside, impossibly soft-on-the-inside masterpiece that makes any meal feel like a celebration. People love cheesy garlic bread because it’s a universal language of deliciousness, a warm hug in edible form that brings smiles and satisfied sighs. What makes this recipe so special? We’re talking about a symphony of pungent garlic, creamy, melty cheeses, and the perfect balance of herbs, all baked to perfection until the cheese is bubbling and irresistible. Get ready to impress yourself and everyone lucky enough to share it with you!
BEST CHEESY GARLIC BREAD RECIPE
There are few things in life as comforting and undeniably delicious as a slice of warm, cheesy garlic bread. It’s the ultimate side dish, perfect for dipping into your favorite pasta sauce, accompanying a hearty soup, or simply enjoying on its own. And let me tell you, this recipe for the BEST Cheesy Garlic Bread is a game-changer. It elevates this classic comfort food to a whole new level of irresistible flavor and texture. We’re going to infuse our garlic butter with deeply roasted garlic, then slather it generously onto impossibly soft King’s Hawaiian rolls, creating a bread that’s crispy on the outside and unbelievably tender within, all loaded with gooey, melted cheese. Get ready to impress yourself and everyone lucky enough to share this with you!
Ingredients:
Instructions:
Roasting the Garlic for Maximum Flavor
The secret weapon in this recipe is undoubtedly the roasted garlic. It transforms pungent raw garlic into a sweet, mellow, and intensely flavorful paste. To achieve this, preheat your oven to 400°F (200°C). Take your 8-10 garlic cloves, peel off the papery outer layers, but leave the cloves whole. Place them on a small piece of aluminum foil, drizzle with 2 tablespoons of olive oil, and sprinkle with a pinch of salt. Wrap the foil up tightly to create a little packet. Place this packet directly on the oven rack and roast for 30-40 minutes, or until the garlic cloves are very soft and slightly caramelized. Once roasted, carefully open the foil packet (watch out for steam!) and let the garlic cool slightly. Then, gently squeeze the softened garlic cloves out of their skins and mash them with a fork to create a paste. This roasted garlic is the foundation of our incredible garlic butter.
Crafting the Irresistible Garlic Butter Spread
In a medium bowl, combine your ½ cup of melted butter with the mashed roasted garlic. This is where the magic really starts to happen. Add the egg and ¼ cup of milk to the butter and garlic mixture. Whisk everything together thoroughly until it’s well combined and smooth. Now, it’s time to season! Stir in ½ teaspoon of salt and ½ teaspoon of paprika. The paprika adds a subtle warmth and a beautiful hint of color to our spread. Finally, fold in the 2 tablespoons of chopped fresh parsley. This adds a lovely fresh note that cuts through the richness of the butter and garlic. Give it one last good stir to ensure all the ingredients are evenly distributed.
Preparing the Rolls for Their Cheesy Destiny
Now for the star of the show in terms of bread: the King’s Hawaiian Origin extractal Sweet Hawaiian Sheet Rolls. You’ll want to keep them in their full sheet form. Using a serrated knife, carefully slice the entire sheet of rolls horizontally, almost all the way through, creating a hinge. Think of it like opening a book. If you are using a French baguette, slice it in half lengthwise. This allows us to generously spread our glorious garlic butter and pile on the cheese.
Applying the Flavor Bomb: Buttering and Layering
This is where we start assembling our masterpiece. Carefully lift the top half of the sliced rolls (or baguette) and gently spread the irresistible garlic butter mixture all over the cut surfaces. Don’t be shy here; we want every nook and cranny to be coated in that garlicky goodness. Make sure to get it all the way to the edges. Then, close the top half of the rolls back over the bottom. Now, using a pastry brush or a spoon, generously apply any remaining garlic butter mixture over the top of the rolls. You want a good, even coating.
The Grand Finnon-alcoholic ale: Cheese, Bake, and Devour!
This is the moment we’ve all been waiting for. Sprinkle the 2 cups of shredded mozzarella cheese evenly over the top of the garlic-buttered rolls. You want a thick, generous layer of cheese that will melt into a gooey, golden blanket. If you’re using a baguette, make sure to get cheese all over the top surface. Place the assembled garlic bread back into the preheated 400°F (200°C) oven. Bake for 10-15 minutes, or until the cheese is melted, bubbly, and beautifully golden brown. Keep an eye on it to prevent burning.
Serving Up Perfection
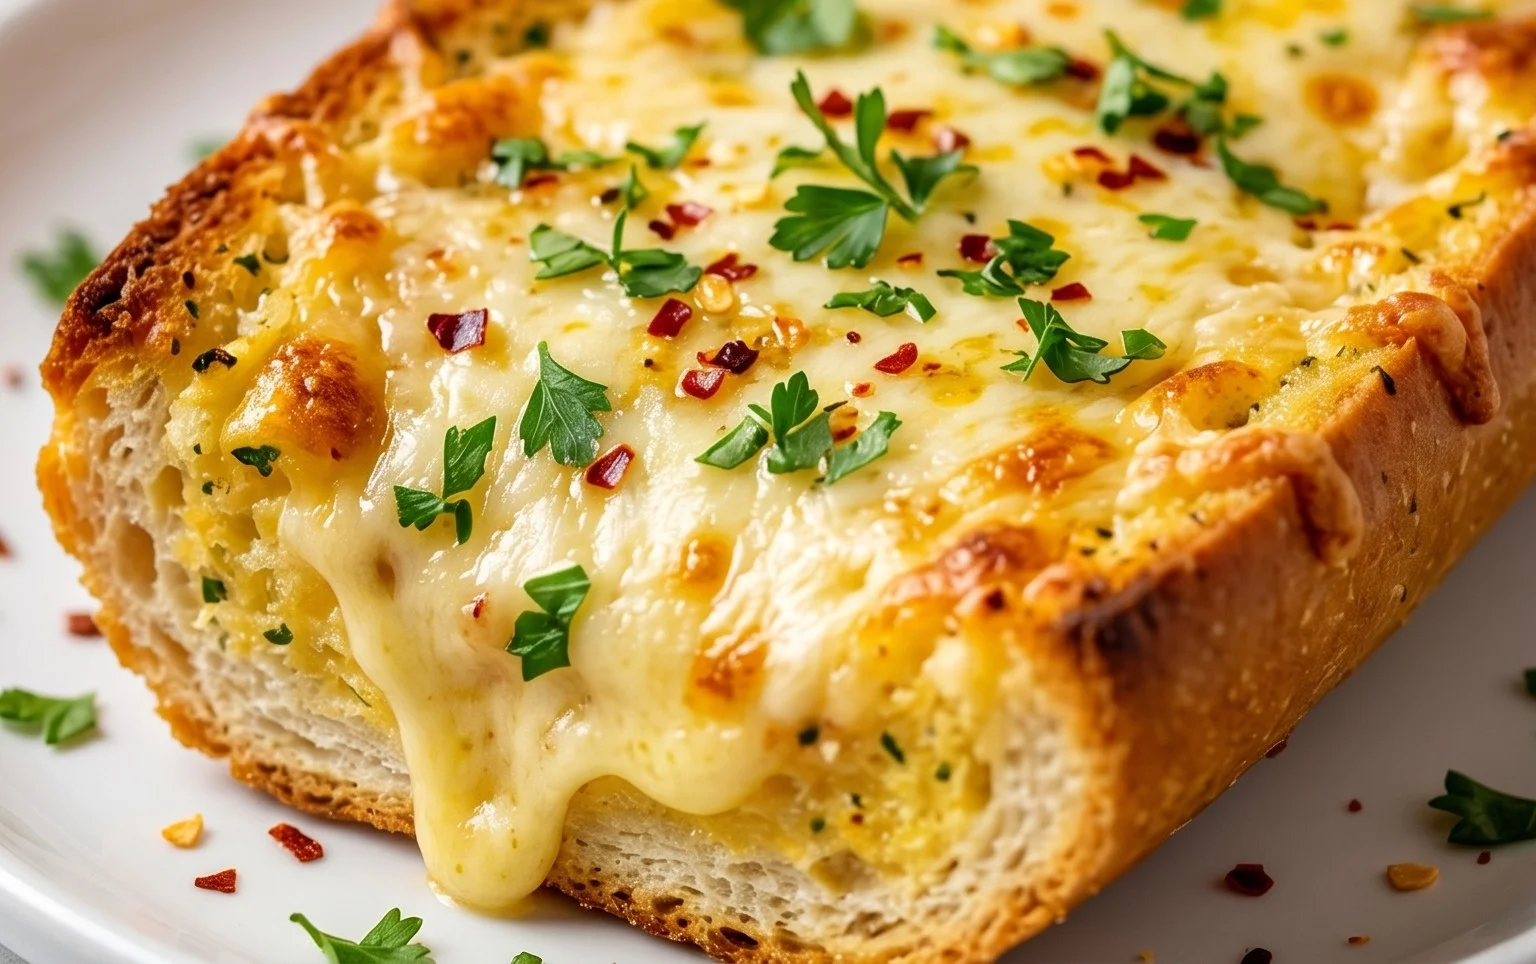
Once out of the oven, let the cheesy garlic bread rest for just a minute or two. This allows the cheese to set slightly. Then, using your serrated knife, carefully slice the sheet of rolls into individual portions (or slice your baguette). Garnish generously with more chopped fresh parsley and a sprinkle of chili flakes for a touch of heat. The aroma alone will have everyone gathering in the kitchen! Serve immediately and watch it disappear. This is truly the best cheesy garlic bread you will ever make, guaranteed to become a family favorite!
Conclusion:
There you have it – the recipe for what I truly believe is the BEST CHEESY GARLIC BREAD! This recipe is a winner because it strikes the perfect balance between a crispy, golden exterior and a wonderfully soft, pillowy interior. The generous amount of garlic, combined with a blend of cheeses that melt into gooey perfection, creates an irresistible aroma and flavor that will have everyone reaching for more. It’s incredibly easy to whip up, making it the ideal side dish for any meal, from a casual weeknight pasta dinner to a more elaborate barbecue spread. The warm, comforting scent alone is enough to make your kitchen feel like the happiest place on earth.
I love serving this cheesy garlic bread alongside spaghetti bolognese, lasagna, or even just a simple soup. It’s also fantastic as an appetizer with a side of marinara for dipping. Don’t be afraid to get creative with variations! Consider adding a pinch of red pepper flakes for a hint of spice, or sprinkle fresh chopped parsley or chives over the top before baking for an extra burst of freshness. You could even experiment with different cheese combinations, like adding some sharp cheddar or Monterey Jack. I truly encourage you to give this recipe a try. It’s a crowd-pleaser that’s sure to become a staple in your cooking repertoire.
Frequently Asked Questions:
Can I use a different type of bread for this recipe?
Absolutely! While a good quality French baguette or Italian loaf works wonderfully, you can also use ciabatta, sourdough, or even thick-sliced challah. The key is a bread that has a good crust to hold up to the toppings and butter mixture.
How do I prevent the garlic bread from becoming soggy?
To ensure a crispy bottom, make sure your oven is preheated properly. Placing the bread directly on the oven rack for the last few minutes of baking, or even broiling it for a very short time (watching carefully to prevent burning!), can help achieve that desired crispiness.
Can I make the garlic butter mixture ahead of time?
Yes, you can definitely prepare the garlic butter mixture in advance. Store it in an airtight container in the refrigerator for up to 2-3 days. Let it soften at room temperature for about 15-20 minutes before spreading it on the bread for easier application.
BEST CHEESY GARLIC BREAD RECIPE
The ultimate cheesy garlic bread recipe, featuring roasted garlic for incredible depth of flavor, paired with soft King’s Hawaiian rolls for a delightful texture.
Ingredients
-
8-10 garlic cloves
-
2 tbsp olive oil
-
Pinch of salt
-
Roasted garlic from above
-
½ cup butter, melted (113g)
-
1 egg
-
¼ cup milk (60g)
-
½ tsp salt
-
½ tsp paprika
-
2 tbsp chopped fresh parsley
-
12 King’s Hawaiian Origin extractal Hawaiian Sheet Rolls, kept in the full sheet form
-
2 cups shredded mozzarella cheese
-
Chopped parsley and chili flakes for serving
Instructions
-
Step 1
Preheat oven to 375°F (190°C). If starting from raw garlic, toss 8-10 garlic cloves with 2 tbsp olive oil and a pinch of salt on a small baking sheet. Roast for 15-20 minutes until softened and fragrant. Let cool slightly, then squeeze the roasted garlic out of its skins into a small bowl. Mash with a fork. -
Step 2
In a medium bowl, combine the melted butter, mashed roasted garlic, egg, milk, ½ tsp salt, paprika, and 2 tbsp chopped fresh parsley. Whisk until well combined. -
Step 3
Place the full sheet of King’s Hawaiian rolls on a baking sheet. Cut the rolls in half horizontally, keeping them attached. Alternatively, if using a baguette, slice it horizontally. -
Step 4
Generously brush the butter and garlic mixture over the cut surfaces of the rolls. Make sure to get into all the crevices. -
Step 5
Sprinkle the shredded mozzarella cheese evenly over the top of the rolls. -
Step 6
Bake for 10-15 minutes, or until the cheese is melted and bubbly and the edges of the bread are golden brown. -
Step 7
Garnish with additional chopped parsley and chili flakes before serving hot.
Important Information
Nutrition Facts (Per Serving)
It is important to consider this information as approximate and not to use it as definitive health advice.
Allergy Information
Please check ingredients for potential allergens and consult a health professional if in doubt.