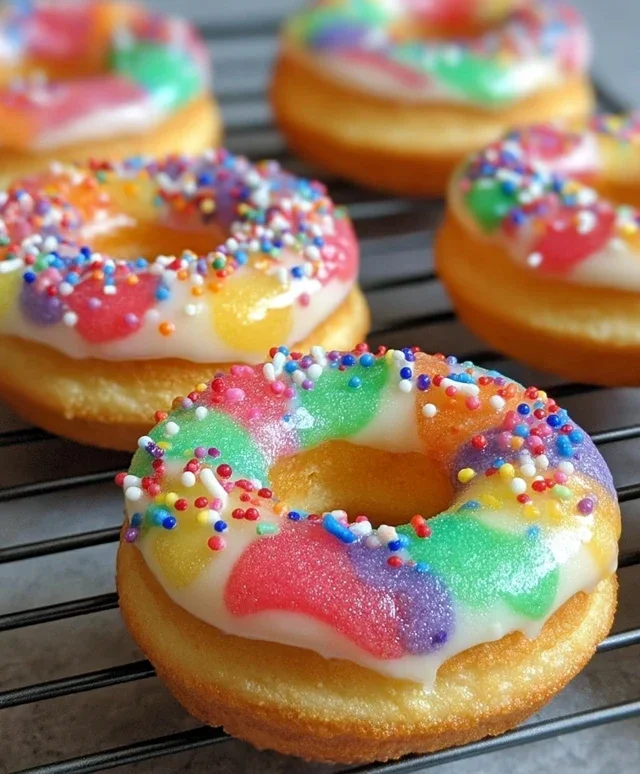
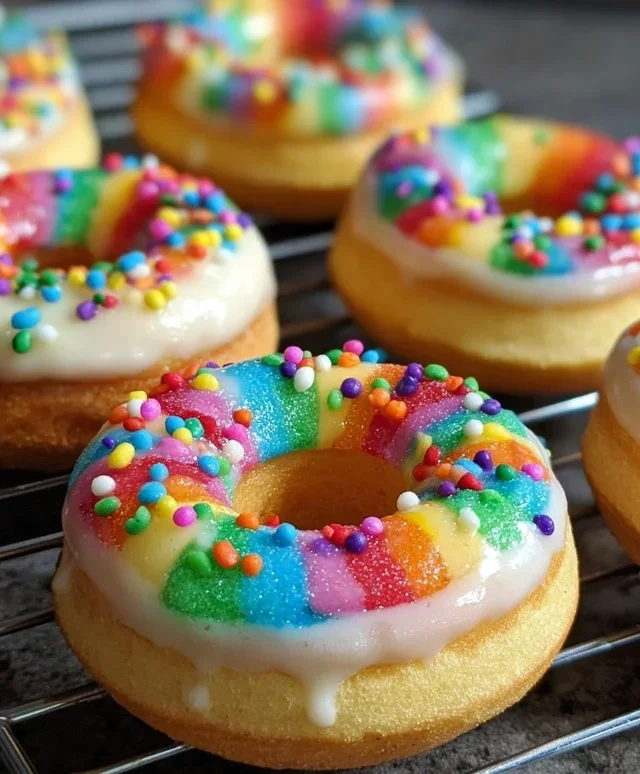
Mini Rainbow Vanilla Bean Donuts Recipe
Mini Rainbow Vanilla Bean Donuts are pure sunshine in a bite, and I’m so excited to share this recipe with you! Imagin extracte tiny, fluffy donut rings, each infused with the unmistakable aroma of real vanilla bean. These aren’t just any donuts; they’re miniature masterpieces designed to brighten your day and dazzle your taste buds. What makes these Mini Rainbow Vanilla Bean Donuts so utterly irresistible? It’s the perfect balance of tender, cake-like texture, the comforting sweetness of vanilla, and the playful pop of vibrant rainbow colors. They’re the ideal treat for birthdays, celebrations, or simply when you need a little extra joy. They’re incredibly fun to make and even more fun to share (or not, I won’t tell!). Get ready to fall in love with these delightful little gems.
Why You’ll Love These Mini Rainbow Vanilla Bean Donuts:
They’re impossibly cute and delicious.
The vanilla bean flavor is a classic for a reason.
The rainbow colors add an instant festive touch.
Mini Rainbow Vanilla Bean Donuts
There’s something undeniably joyous about donuts, and transforming them into mini, rainbow-hued delights takes the fun factor to a whole new level. These Mini Rainbow Vanilla Bean Donuts are not only a feast for the eyes with their vibrant colors, but they also deliver a delicate, classic vanilla bean flavor that is simply irresistible. Perfect for parties, special occasions, or just a cheerful weekend treat, these little beauties are surprisingly simple to make and are sure to bring smiles all around. The combination of tender, cake-like donuts and a sweet, simple glaze makes for a truly delightful bite. We’ll be using a donut pan to achieve those perfect little shapes, but the magic truly happens when we infuse our batter with the wonderful aroma and taste of real vanilla bean and then add a pop of rainbow color to the glaze. Get ready to embrace your inner baker and create something truly special!
Ingredients:
Making the Donut Dough
First, let’s get our donut batter ready. In a large mixing bowl, whisk together the sifted all-purpose flour, granulated sugar, baking powder, and salt. Sifting the flour is an important step as it helps to aerate it, leading to a lighter and more tender donut. This dry mixture will form the base of our delicious donuts.
In a separate bowl, combine the buttermilk, lightly beaten eggs, melted butter, and 1 teaspoon of vanilla extract. Make sure your melted butter isn’t too hot, as you don’t want to cook the eggs. Now, for that incredible vanilla flavor, we’ll scrape out the seeds from one vanilla bean and add them to this wet mixture. The little specks of vanilla bean throughout the dough are not only beautiful but also infuse every bite with a deep, rich vanilla essence. Whisk these wet ingredients together until they are well combined.
Now, it’s time to bring everything together. Pour the wet ingredients into the bowl with the dry ingredients. Mix until just combined. Be careful not to overmix, as this can develop the gluten in the flour too much and result in tough donuts. A few small lumps in the batter are perfectly fine. The batter should be thick but pourable.
Coloring and Baking Your Donuts
This is where the rainbow magic begin extracts! Divide your donut batter into six equal portions in separate small bowls. Add a different gel food coloring to each portion: red, orange, yellow, green, blue, and purple. Gently stir each portion until the color is evenly distributed. You want vibrant colors, so don’t be shy with the gel coloring! Remember, gel food coloring is concentrated, so a little goes a long way.
Preheat your oven to 350°F (175°C). Grease your mini donut pan thoroughly. If you don’t have a donut pan, you can use a mini muffin pan, but the shape will be different. Now, carefully spoon or pipe your colored batters into the donut cavities. You can layer the colors within each donut hole for a marbled effect, or simply fill each donut with a single color. For a more controlled filling, a piping bag or a Ziploc bag with a corner snipped off works wonders. Fill each cavity about two-thirds full, as the donuts will puff up as they bake.
Bake for 9-12 minutes, or until a toothpick inserted into the center of a donut comes out clean. The baking time can vary slightly depending on your oven and the size of your donut pan, so keep an eye on them. Once baked, let the donuts cool in the pan for a few minutes before carefully transferring them to a wire rack to cool completely.
Glazing and Decorating
While the donuts are cooling, let’s prepare the glaze. In a medium bowl, whisk together the sifted confectioners’ sugar and 1 tablespoon of milk or heavy cream. Add ½ teaspoon of vanilla extract. Whisk until smooth. The glaze should be thick enough to coat the back of a spoon but thin enough to drip slightly. If it’s too thick, add a tiny bit more milk or cream, a teaspoon at a time, until you reach your desired consistency. If it’s too thin, add a little more sifted confectioners’ sugar.
Once the donuts are completely cool, it’s time to glaze them. You have a couple of fun options here. You can dip each donut into the glaze, letting the excess drip off. Or, you can spoon the glaze over the top of each donut. For a true rainbow effect, you can divide the glaze into smaller bowls and tint each portion with a different food coloring, then drizzle or dip your donuts in alternating colors.
Finishing Touches
Now for the final flourish! While the glaze is still wet, generously sprinkle your Mini Rainbow Vanilla Bean Donuts with rainbow sprinkles. This step is entirely optional, but it adds an extra layer of fun and color that perfectly complements the donuts. The sprinkles will adhere nicely to the glaze, creating a festive and festive finish.
Let the glazed donuts sit on the wire rack for at least 15-20 minutes to allow the glaze to set. This will prevent the glaze from smudgin extractg when you handle them. And there you have it – a batch of utterly charming and delicious Mini Rainbow Vanilla Bean Donuts! They are best enjoyed fresh, but can be stored in an airtight container at room temperature for a day or two. Enjoy your little bursts of color and flavor!
Conclusion:
I hope you’ve enjoyed learning how to create these delightful Mini Rainbow Vanilla Bean Donuts! They truly are a fantastic recipe because they offer a burst of vibrant color and a classic, comforting vanilla bean flavor in a perfectly bite-sized package. The airy, tender crum extractb combined with a sweet glaze makes them irresistible. These mini donuts are incredibly versatile, perfect for a festive celebration, a fun weekend baking project with family, or simply as a sweet treat to brighten your day. I encourage you to give this recipe a try – you won’t be disappointed!
For serving, imagin extracte them as part of a brunch spread, a colorful addition to a dessert table, or even as a special morning treat with your coffee. They also make a thoughtful homemade gift.
Don’t be afraid to get creative with variations! You could add a touch of lemon zest to the glaze for a citrusy kick, or swirl a little chocolate into the batter for a marbled effect. Feel free to experiment with different food coloring combinations to achieve unique rainbow hues.
Frequently Asked Questions:
Can I make these donuts ahead of time?
Absolutely! These Mini Rainbow Vanilla Bean Donuts can be made a day in advance. Store them in an airtight container at room temperature. While they are best enjoyed fresh, they will still be delicious the next day. The glaze might set a little firmer upon sitting.
What’s the best way to color the batter evenly for the rainbow effect?
To achieve the best rainbow effect, divide your batter into as many bowls as you have colors. Add a small amount of gel food coloring to each bowl and gently fold it in until the color is uniform. Gel food coloring provides more vibrant colors without adding extra liquid to your batter, which could affect the texture. Then, spoon dollops of each colored batter into your donut molds, alternating colors for that beautiful marbled rainbow look.
Can I bake these in a different donut pan?
Yes, you can! While this recipe is written for mini donut pans, you could adapt it for standard-sized donut pans, though baking times will likely need to be adjusted. You might also be able to bake them in mini muffin tins for a donut-hole-like treat, again, adjusting baking times accordingly. Keep a close eye on them to prevent overbaking.
Mini Rainbow Vanilla Bean Donuts
Delightful mini donuts infused with real vanilla bean and vibrantly colored for a festive treat. Perfect for parties or a fun baking project.
Ingredients
-
2 cups all-purpose flour, sifted
-
¾ cup granulated sugar
-
2 teaspoons baking powder
-
½ teaspoon salt
-
¾ cup buttermilk
-
2 large eggs, lightly beaten
-
2 tablespoons butter, melted
-
1 teaspoon vanilla extract
-
Seeds from 1 vanilla bean
-
Gel food coloring (red, orange, yellow, green, blue, purple)
-
1 cup confectioners’ sugar, sifted
-
1 tablespoon whole milk or heavy cream
-
½ teaspoon vanilla extract
-
Rainbow sprinkles (optional)
Instructions
-
Step 1
Preheat oven to 350°F (175°C). Grease and flour a mini donut pan. -
Step 2
In a large bowl, whisk together the sifted flour, granulated sugar, baking powder, and salt. -
Step 3
In a separate bowl, whisk together the buttermilk, beaten eggs, melted butter, 1 teaspoon vanilla extract, and seeds from the vanilla bean. -
Step 4
Pour the wet ingredients into the dry ingredients and mix until just combined. Do not overmix. -
Step 5
Divide the batter into 6 equal portions. Tint each portion with a different gel food coloring. Spoon the colored batters into separate piping bags (or zip-top bags with a corner snipped off). -
Step 6
Pipe the colored batters into the mini donut pan cavities, alternating colors to create a marbled or layered effect. Bake for 9-12 minutes, or until a toothpick inserted into the center comes out clean. -
Step 7
Let the donuts cool in the pan for a few minutes before transferring them to a wire rack to cool completely. -
Step 8
For the glaze, whisk together the sifted confectioners’ sugar, 1 tablespoon milk or cream, and ½ teaspoon vanilla extract until smooth. Add more milk or cream, a teaspoon at a time, to reach desired consistency. Optionally, add a drop of food coloring. -
Step 9
Dip the cooled donuts into the glaze. If using, immediately add rainbow sprinkles.
Important Information
Nutrition Facts (Per Serving)
It is important to consider this information as approximate and not to use it as definitive health advice.
Allergy Information
Please check ingredients for potential allergens and consult a health professional if in doubt.