Easy Fruit Curd Recipe- Deliciously Smooth & Tangy
Fruit curd is one of those magical ingredients that can transform the ordinary into the extraordinary. Imagin extracte a velvety, sunshine-bright concoction, bursting with the vibrant tang of your favorite fruits. That’s the essence of fruit curd! It’s not just a topping; it’s a culinary cbeef hameleon, a secret weapon that elevates everything it touches. From the delicate zest of lemon to the exotic allure of passionfruit, the possibilities for this incredibly versatile fruit curd are truly endless. People adore it because it offers a beautiful balance of sweet and tart, a luxurious texture that melts in your mouth, and an undeniable homemade charm that store-bought versions simply can’t replicate. What makes it so special is its incredible adaptability – a simple base can be infused with countless flavors, making each batch uniquely yours and utterly delightful.
Fruit Curd
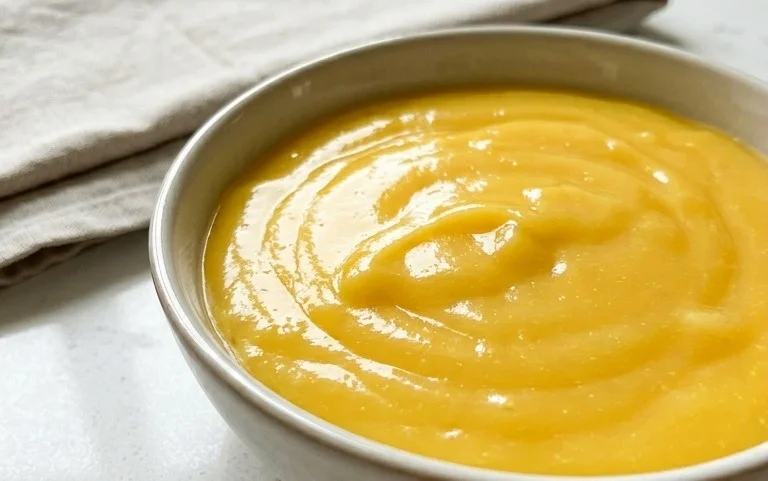
There’s something undeniably luxurious about a homemade fruit curd. Its silky smooth texture and intensely vibrant flavor are a testament to the simple magic that happens when fruit, sugar, eggs, and butter come together. Forget the store-bought stuff; making your own fruit curd is surprisingly straightforward and incredibly rewarding. The versatility of curd is astounding – it’s perfect for filling tarts and cakes, dolloping onto scones and pancakes, swirling into yogurt, or simply enjoying by the spoonful straight from the jar. While lemon curd is perhaps the most classic, the beauty of this recipe lies in its adaptability. I’ll be guiding you through the process with a focus on a bright and zesty lemon curd, but feel free to experiment with other fruits like lime, passionfruit, or even berries!
Ingredients:
Cooking Instructions:
This process relies on gentle heat and constant attention to achieve that perfect, custard-like consistency. Don’t be tempted to rush it – patience is key to a truly sublime curd.
Phase 1: Preparing the Base
1. In a medium, heavy-bottomed saucepan (this is important to prevent scorching), whisk together the 4 large egg yolks and 1 large whole egg until well combined and slightly pnon-alcoholic aler in color. This initial whisking ensures the eggs are evenly distributed, which will help them cook uniformly. Next, add the 150g (¾ cup) of caster sugar to the egg mixture. Caster sugar dissolves more readily than granulated sugar, contributing to a smoother curd. Whisk these together vigorously for about a minute until the mixture is thick, pnon-alcoholic ale, and resembles ribbon-like trails when you lift the whisk. This process, known as ‘ribbon stage,’ incorporates air and helps dissolve the sugar completely.
2. Now, it’s time to introduce the star flavor: the lemon. Add the 120ml (½ cup) of fresh lemon juice to the egg and sugar mixture. For the most intense citrus punch, use freshly squeezed juice. Strain out any seeds, but don’t worry about straining out pulp unless you prefer an absolutely pristine texture. Following that, add the finely grated zest of 1 lemon. The zest contains the essential oils of the lemon, which are packed with fragrant and delicious citrus notes. Stir everything together until it’s thoroughly combined. The mixture will look quite liquid at this stage, but don’t worry, it will thicken beautifully.
Phase 2: Gentle Cooking and Thickening
3. Place the saucepan over a medium-low heat. This is where the magic happens, but it requires your undivided attention. You’ll need to stir the mixture constantly using a heatproof spatula or a wooden spoon. The goal is to gently cook the eggs and thicken the curd without scrambling them. Imagin extracte you’re coaxing the ingredients into a delicious harmony. Keep scraping the bottom and sides of the pan to ensure even cooking. You’ll notice the mixture slowly starting to thicken. This process can take anywhere from 8 to 15 minutes, depending on the heat of your stove. Resist the urge to turn up the heat – a slow and steady approach is crucial.
4. Continue stirring until the curd has thickened enough to coat the back of a spoon. You can test this by dipping your spatula into the mixture, then drawing a line through it with your finger. If the line holds its shape and the curd doesn’t immediately run back together, it’s ready. Another indicator is when the curd registers about 75-77°C (165-170°F) on an instant-read thermometer if you have one. Be careful not to overcook it, as this can lead to a rubbery or scrambled egg texture. Once it has reached this desired consistency, immediately remove the saucepan from the heat.
Phase 3: Enriching and Finishing
5. The final step in achieving that signature richness and silky smoothness is incorporating the butter. While the curd is still hot (but off the heat), add the 115g (½ cup / 1 stick) of unsalted butter, cut into small cubes and chilled. Add the butter a few cubes at a time, stirring continuously until each addition is fully melted and emulsified into the curd. The cold butter helps to cool down the curd slightly, preventing further cooking, and its fat content creates a luxurious, velvety texture. Keep stirring until all the butter has been incorporated and the curd is glossy and smooth. This process might take a couple of minutes.
Once the butter is fully incorporated and the curd is beautifully smooth and glossy, you’re almost done. Strain the curd through a fine-mesh sieve into a clean bowl. This step is optional but highly recommended for an ultra-smooth finish, removing any tiny bits of cooked egg or zest that might have escaped. While the curd is still warm, cover it directly with plastic wrap, pressing the wrap onto the surface of the curd. This prevents a skin from forming as it cools. Allow the curd to cool at room temperature for about 30 minutes, then refrigerate it for at least 2-3 hours, or preferably overnight, to allow it to fully set and for the flavors to meld. The curd will continue to thicken as it chills. Store your homemade fruit curd in an airtight container in the refrigerator for up to a week. Enjoy the fruits of your labor!
Conclusion:
And there you have it – your guide to creating a wonderfully versatile and incredibly delicious fruit curd! This recipe truly shines because it transforms simple, fresh ingredients into a luxurious, tangy, and sweet treat that’s surprisingly easy to make. The vibrant flavor of your chosen fruit takes center stage, balanced perfectly by the richness of butter and the smooth texture from the eggs. It’s a testament to how a few fundamental techniques can yield impressive results in your own kitchen. I truly encourage you to give this fruit curd a try; you’ll be amazed at how often you’ll find yourself reaching for this homemade delight.
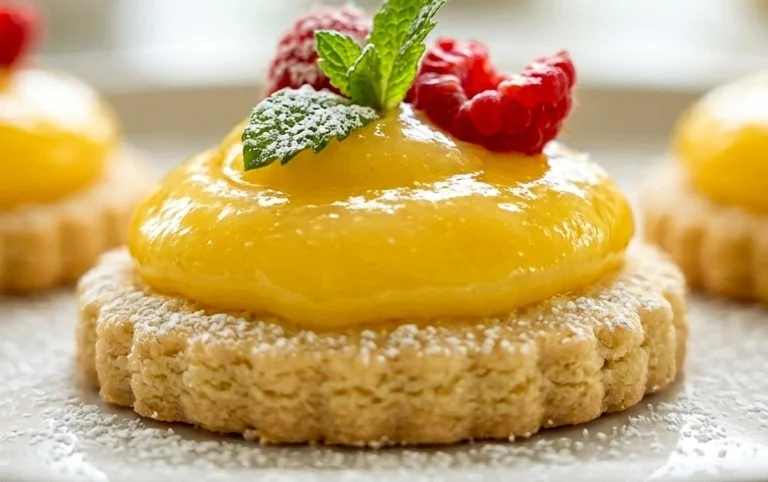
The serving possibilities are virtually endless! Spoon it generously over warm scones or toast for a delightful breakfast. Use it as a filling for tarts, cakes, and cupcakes for an elegant dessert. Swirl it into yogurt or ice cream for an instant flavor upgrade. For variations, don’t hesitate to experiment! Beyond the classic lemon and lime, try berries like raspberries or blueberries, or even tropical fruits like passionfruit or mango for a sun-kissed twist. The key is to embrace the brightness and versatility this fruit curd offers.
Frequently Asked Questions:
What is the best way to store fruit curd?
You can store your homemade fruit curd in an airtight container in the refrigerator for up to a week. Ensure it’s completely cooled before sealing the container to prevent condensation. It’s best enjoyed within a few days for optimal freshness and flavor.
Can I make fruit curd without eggs?
While traditional fruit curd relies on eggs for thickening and richness, it is possible to make a dairy-free or egg-free version. You can substitute cornstarch or arrowroot powder for the eggs, and use plant-based butter and milk alternatives. The texture will be slightly different, but still delicious!
My fruit curd is lumpy. What went wrong?
Lumps often form if the eggs cook too quickly or are not whisked in gradually. To prevent this, always temper your eggs by whisking a small amount of the hot fruit mixture into the beaten eggs before adding the egg mixture back to the saucepan. Cooking over low to medium heat and stirring constantly is also crucial.
Fruit Curd
A smooth and tangy fruit curd, perfect for tarts, cakes, or simply enjoyed with a spoon.
Ingredients
-
4 oz (113g) unsalted butter
-
4 large eggs
-
2 large egg yolks
-
1 cup (200g) granulated sugar
-
1/2 cup (120ml) fresh lemon juice
-
1/4 cup (60ml) fresh lime juice
-
1/4 teaspoon salt
Instructions
-
Step 1
Melt the butter in a small saucepan over low heat. -
Step 2
In a medium heatproof bowl, whisk together the eggs, egg yolks, and sugar until well combined. -
Step 3
Whisk in the lemon juice, lime juice, and salt. -
Step 4
Place the bowl over a saucepan filled with about an inch of simmering water (a double boiler). Ensure the bottom of the bowl does not touch the water. -
Step 5
Cook, whisking constantly, until the mixture thickens enough to coat the back of a spoon, about 8-10 minutes. Do not let it boil. -
Step 6
Remove the bowl from the heat and stir in the melted butter until fully incorporated and smooth. -
Step 7
Strain the curd through a fine-mesh sieve into a clean bowl or jars. -
Step 8
Cover the surface of the curd directly with plastic wrap to prevent a skin from forming, and refrigerate until firm, at least 2 hours.
Important Information
Nutrition Facts (Per Serving)
It is important to consider this information as approximate and not to use it as definitive health advice.
Allergy Information
Please check ingredients for potential allergens and consult a health professional if in doubt.