Easy Japanese Tuna Onigiri Quick Recipe
15-min. Easy Japanese Tuna Onigiri are the ultimate speedy meal solution for when hunger strikes and time is short! As a huge fan of quick, delicious, and satisfying snacks, I’ve come to rely on these little rice balls for everything from a light lunch to a power-packed post-workout refuel. What’s not to love about perfectly seasoned, fluffy rice embracing a savory, umami-rich tuna filling? It’s this simple yet profound flavor combination that has made Japanese tuna onigiri a beloved staple for generations. They’re incredibly versatile – you can customize the filling, pack them for picnics, or enjoy them warm right off the stove. The magic lies in their portable nature and the delightful surprise hidden within each bite. Let’s dive into how you can whip up your own batch of 15-min. Easy Japanese Tuna Onigiri in no time at all!
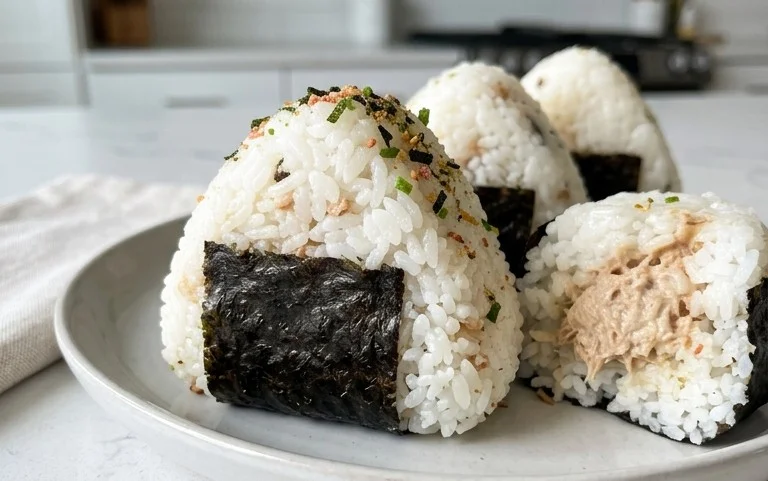
15-Minute Easy Japanese Tuna Onigiri
Craving a quick, satisfying, and authentically Japanese snack or light meal? Look no further than these incredibly easy 15-minute Tuna Onigiri! These rice balls are a staple in bento boxes and convenience stores across Japan, and for good reason. They’re portable, customizable, and utterly delicious. The combination of savory tuna, creamy mayonnaise, and perfectly seasoned rice, all wrapped in crisp nori seaweed, is pure comfort food. Best of all, you can whip up a batch in under 15 minutes, making them ideal for busy mornings, a speedy lunch, or a delightful afternoon pick-me-up.
Traditionally, onigiri can be a bit intimidating to make at home, with fears of sticky rice and misshapen balls. However, with this simple recipe, you’ll be a pro in no time. We’ll walk you through each step, ensuring your onigiri are perfectly formed and bursting with flavor. So grab your ingredients and let’s get started on this delightful Japanese culinary adventure!
Ingredients:
Cooking Instructions
Step 1: Prepare the Tuna Filling
The first step to creating your delicious onigiri is to get your tuna filling ready. Open your can of tuna and drain any excess liquid. If you’re using tuna packed in oil, draining is crucial to prevent your rice from becoming too greasy. If you’re using tuna packed in water, drain it thoroughly as well. Transfer the drained tuna to a small bowl. Now, add the mayonnaise. Japanese mayonnaise, like Kewpie, has a slightly richer, tangier flavor that’s perfect for onigiri, but regular mayonnaise will work just fine if that’s what you have on hand. Mix the tuna and mayonnaise together until well combined. You’re looking for a creamy, cohesive mixture where the tuna is evenly coated. You can add a pinch of black pepper at this stage if you like a little extra kick, but it’s entirely optional. This filling is key to the savory flavor of your onigiri.
Step 2: Season the Rice
While you can enjoy onigiri with plain rice, a little seasoning takes them to the next level. In a separate bowl, place your 2 cups of cooked short-grain rice. It’s important to use short-grain rice because its stickiness helps the onigiri hold their shape. If you’re using freshly cooked rice, let it cool slightly so it’s warm but not scalding hot – this makes it easier to handle. Sprinkle the 1/2 teaspoon of salt over the rice. Gently mix the salt into the rice, ensuring it’s distributed evenly. You want to taste the salt subtly, enhancing the natural sweetness of the rice without making it overly salty. Be careful not to mash the rice grains; a gentle folding motion is best.
Step 3: Assemble the Onigiri
Now for the fun part: shaping the onigiri! There are a few ways to do this, but a common and easy method is to wet your hands slightly with water. This prevents the rice from sticking to your palms. Take about 1/4 cup of the seasoned rice into your hand. Make a small indentation in the center of the rice with your finger. Place about a tablespoon of the prepared tuna mixture into this indentation. Now, carefully fold the rice around the tuna filling, enclosing it completely. Gently shape the rice into your desired form. The most classic shape is a triangle, but spheres or cylinders are also perfectly acceptable and equally delicious. The key is to pat and press gently but firmly to create a compact ball that won’t fall apart. If the rice is sticking too much, simply re-wet your hands.
Step 4: Shape and Finalize
Continue this process until you’ve used up all your rice and filling. For the triangular shape, start by pressing the rice into a loose ball. Then, using the sides of your palms and fingers, gently press to form three distinct sides. You can even use the edge of your hand to create a cleaner edge. As you shape, ensure there are no cracks or gaps where the filling might escape. If you find the rice is too sticky, a little more water on your hands will do the trick. Don’t be afraid to experiment with the pressure; too little and your onigiri might crum extractble, too much and they could become dense. Aim for a firm yet yielding texture.
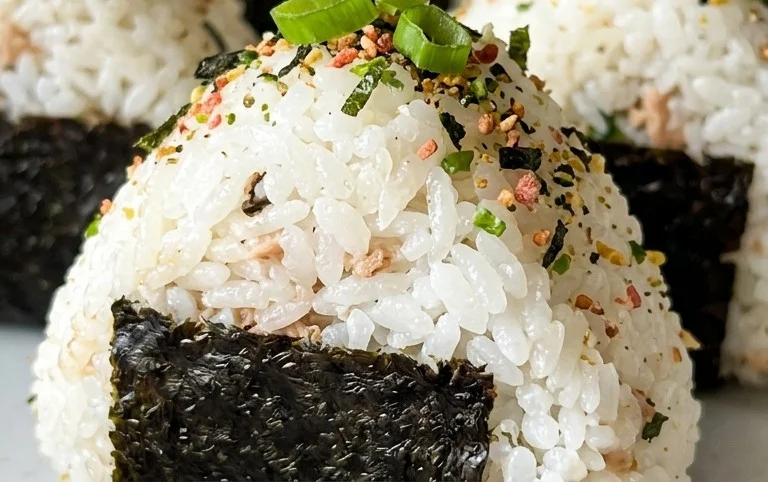
Step 5: Wrap with Nori and Garnish
Once your onigiri are shaped, it’s time to add the finishing touch with the nori seaweed. If you’re using full sheets, cut them into strips about 1 to 1.5 inches wide. You can wrap a whole strip around the base of your onigiri, or cut smaller pieces to accent different parts. Some people prefer to wrap only one side, while others like to fully encase their rice ball. The nori adds a wonderful savory, oceanic flavor and a satisfying crunch. If you like, sprinkle the optional sesame seeds onto the nori or directly onto the onigiri before it sets for an extra touch of flavor and visual appeal. Press them gently so they adhere to the rice. This is where your onigiri truly come to life! Your 15-minute onigiri are now ready to be enjoyed immediately or packed for later.
Notes:
Conclusion:
And there you have it – delicious and satisfying Japanese Tuna Onigiri ready in just 15 minutes! This recipe is a true game-changer for those busy days when you crave something homemade, healthy, and bursting with flavor. The simplicity of the ingredients and the speed of preparation make this an ideal option for a quick lunch, a light dinner, or even a portable snack. You’ll be amazed at how easily you can whip up these tasty rice balls, perfect for satisfying those cravings!
These versatile onigiri are wonderful on their own, but they also pair beautifully with a side of miso soup, a simple green salad, or some pickled vegetables for a more complete meal. Don’t be afraid to get creative with your fillings! While classic tuna mayo is fantastic, consider adding a sprinkle of furikake for extra texture and flavor, a thin slice of avocado, or even some finely chopped kimchi for a spicy kick. The possibilities are truly endless!
I truly encourage you to give this Japanese Tuna Onigiri recipe a try. It’s an accessible and rewarding way to bring a taste of Japan into your kitchen with minimal effort. Happy making!
Frequently Asked Questions:
Can I make the rice ahead of time?
Absolutely! You can cook your sushi rice a day in advance and store it in the refrigerator. When you’re ready to make your onigiri, gently reheat the rice before shaping. This can save even more time during the preparation process.
What if I don’t have sushi rice?
While sushi rice is ideal due to its stickiness, you can use medium or short-grain white rice in a pinch. Ensure you cook it thoroughly so it holds its shape when formed into balls. Avoid long-grain rice, as it won’t stick together as well.
Can I freeze my onigiri?
It’s generally not recommended to freeze cooked onigiri, as the rice texture can become mushy upon thawing. They are best enjoyed fresh, within a day or two of preparation.
15-min. Easy Japanese Tuna Onigiri
Quick and simple tuna onigiri, perfect for a light meal or snack. Uses canned tuna and pre-cooked rice for speed.
Ingredients
-
2 cups cooked short grain rice
-
1/2 tsp salt
-
5.29 oz canned tuna (in oil recommended, or canned tuna in water)
-
2 tbsp Japanese mayo (or regular mayonnaise)
-
2 sheets nori (or use 1/2 sheet if you prefer less)
-
1 tsp sesame seeds (for garnishing, optional)
Instructions
-
Step 1
In a bowl, gently mix the cooked short grain rice with salt. -
Step 2
Drain the canned tuna well and flake it into a separate bowl. Mix with the mayonnaise. -
Step 3
Wet your hands with water to prevent rice from sticking. Take a portion of rice (about 1/2 cup) and flatten it in your palm. -
Step 4
Place a spoonful of the tuna mixture in the center of the flattened rice. Carefully cover the tuna with more rice, forming a ball or triangle shape. -
Step 5
Wrap the onigiri with a piece of nori. If using sesame seeds, sprinkle them onto the onigiri before or after wrapping with nori. -
Step 6
Repeat with the remaining rice and tuna mixture.
Important Information
Nutrition Facts (Per Serving)
It is important to consider this information as approximate and not to use it as definitive health advice.
Allergy Information
Please check ingredients for potential allergens and consult a health professional if in doubt.