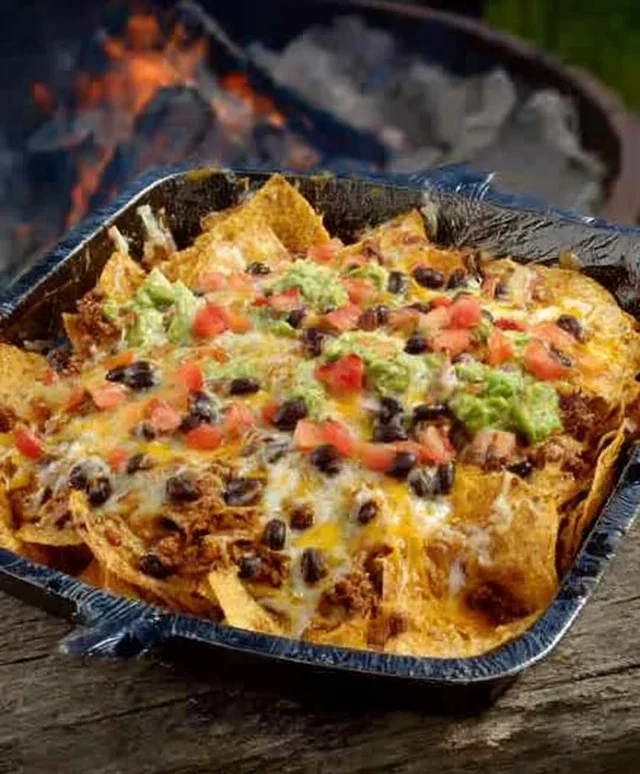
Campfire Grilled Nachos- Easy & Delicious Outdoor Treat
Campfire grilled nachos are more than just a snack; they’re an experience. Imagin extracte this: the crackling flames of your campfire, the scent of woodsmoke in the air, and the promise of bubbling, cheesy goodness. There’s something undeniably magical about transforming simple ingredients into a glorious mess of flavor under the open sky. We all love nachos, but campfire grilled nachos elevate this beloved dish to a whole new level of deliciousness. The smoky char from the grill infuses every layer, creating a depth of flavor you just can’t replicate in your kitchen. They’re perfect for sharing with friends and family, a communal delight that brings everyone together. Whether you’re camping, tailgating, or just enjoying a backyard fire pit, these campfire grilled nachos are guaranteed to be a hit.
Why You’ll Love This Recipe:
Simple Ingredients, Big Flavor
The beauty of campfire grilled nachos lies in their versatility and ease. We’ll guide you through creating the ultimate layered masterpiece, bursting with your favorite toppings. Get ready to impress yourself and your fellow adventurers!
Campfire Grilled Nachos: The Ultimate Outdoor Treat
There’s something undeniably magical about cooking over an open flame. The smoky aroma, the crackling fire, and the satisfaction of creating a delicious meal with simple ingredients – it’s an experience that feeds the soul as much as the stomach. And when it comes to campfire cooking, few dishes are as universally loved and ridiculously easy to assemble as campfire grilled nachos. Forget fancy gadgets; all you need is a good fire and a cast-iron skillet or a sturdy disposable aluminum pan. These nachos are perfect for a casual camping dinner, a fun backyard gathering, or even a quick weeknight adventure if you have a fire pit. They’re customizable, incredibly forgiving, and always a crowd-pleaser. Get ready to elevate your outdoor dining game with this ultimate campfire treat!
Ingredients:
Preparation and Setup
Before you even think about assembling your nachos, it’s crucial to get your campfire ready. You want a good bed of glowing embers, not roaring flames. This provides consistent, controllable heat, which is key to perfectly melted cheese without burning your chips. If you’re using a cast-iron skillet, give it a good scrub and ensure it’s dry. If you’re opting for an aluminum pan, make sure it’s heavy-duty enough to withstand the heat.
The beauty of campfire nachos is their simplicity. Most of your prep can and should be done at home before you head out to your campsite. Chop your tomatoes and onions, drain and rinse your beans, and have your cheese pre-shredded. This saves you time and effort when you’re already dealing with the fire. For the ground meat, you can cook it beforehand and bring it along, or cook it over the fire if you’re feeling adventurous. To do this, simply brown the meat in your skillet over medium heat, drain off any excess fat, and then stir in the taco seasoning and about 1/4 cup of water. Let it simmer for a few minutes until the liquid has mostly evaporated and the meat is well-coated.
Assembling Your Masterpiece
Once your fire is at the ideal temperature and your ingredients are prepped, it’s time to build your nacho masterpiece. Think of this as your edible canvas. The goal is to layer everything so that each chip gets a little bit of everything, and the cheese melts beautifully over the top.
Step-by-Step Cooking Instructions:
1. Build the Base Layer: Start by spreading a generous layer of tortilla chips across the bottom of your cast-iron skillet or aluminum pan. Try to create an even layer so that most of the chips will get exposed to the heat and cheese. Don’t overcrowd the pan; you might need to do this in batches if your pan is small or you have a large gathering.
2. Add the Savory Elements: Evenly distribute your cooked ground meat mixture and your chosen beans over the tortilla chips. Make sure to get some of both on each section of the chip layer. If you’re using refried beans, you can spoon dollops of them across the chips. Then, scatter your diced tomatoes and chopped onions over the meat and beans. This layer adds moisture, flavor, and texture to your nachos.
3. Bring on the Heat (Optional but Recommended): Sprinkle your chilis or diced peppers over the meat and vegetable mixture. This is where you can control the spice level of your nachos. If you like it mild, use fewer peppers or opt for milder varieties. If you’re a heat seeker, go for jalapeños or even a hotter pepper! This layer adds a delightful kick and complexity to the overall flavor profile.
4. The Cheesy Finnon-alcoholic ale: This is arguably the most crucial step for truly epic nachos. Generously sprinkle your shredded cheese blend evenly over everything. Make sure to get good coverage so that the cheese can melt and bind all the delicious layers together. Don’t be shy with the cheese – it’s what makes nachos, well, nachos! You want enough cheese to create a glorious, gooey blanket.
5. Grill to Perfection: Carefully place your skillet or pan directly over the glowing embers of your campfire. You want indirect heat, meaning not directly in the flames. If your fire is too hot, you can elevate the pan slightly by placing it on a few rocks or using a grill grate. Let the nachos cook for about 5-10 minutes, or until the cheese is completely melted and bubbly, and the edges of the chips are starting to crisp up slightly. Keep a close eye on them; campfire cooking can be unpredictable, and you don’t want the bottom layer to burn before the cheese melts. Rotate the pan occasionally to ensure even heating.
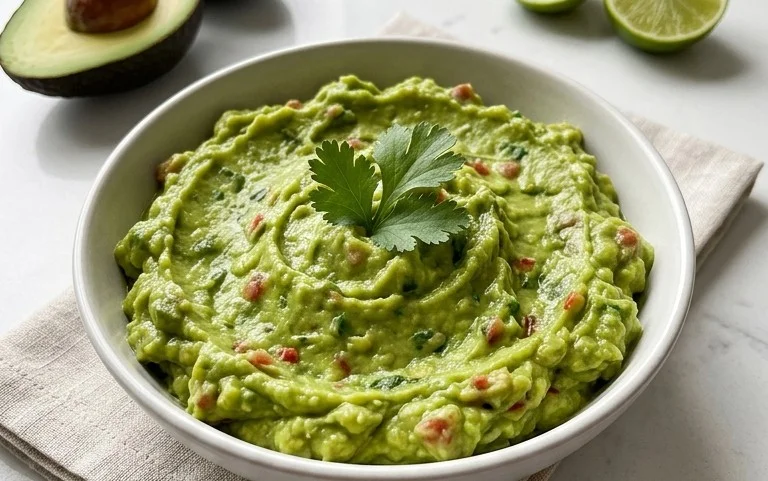
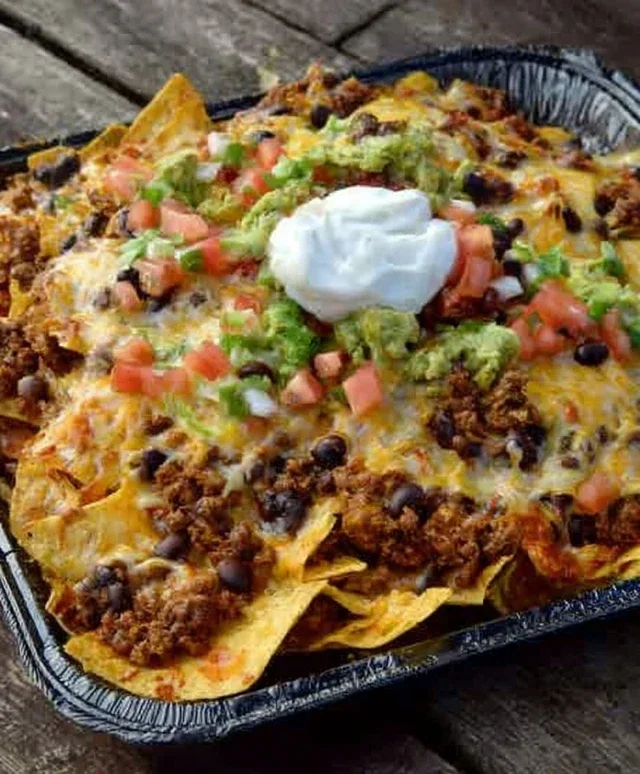
6. The Grand Reveal and Toppings: Once the cheese is perfectly melted and gooey, carefully remove the skillet or pan from the fire using heavy-duty oven mitts or a campfire grill tool. Let it sit for a minute or two to cool slightly before serving. Now comes the fun part: adding your fresh toppings! Pile on the diced avocado, and if you’re serving immediately, add dollops of sour cream, a spoonful of salsa, and a sprinkle of fresh cilantro. A squeeze of lime juice over the top adds a bright, zesty finish.
Enjoy your incredibly satisfying, smoky, and cheesy campfire grilled nachos! They’re best enjoyed hot, straight from the fire, with good company and the beautiful ambiance of the outdoors.
Conclusion:
There you have it – a surefire way to elevate your next outdoor adventure with these incredible Campfire Grilled Nachos! This recipe is a winner because it’s incredibly simple to make with minimal cleanup, delivering maximum flavor and that irresistible smoky char only a campfire can provide. The beauty of these nachos lies in their versatility; they’re perfect as a hearty appetizer for a group, a satisfying lunch after a hike, or even a fun dinner under the stars. Don’t be afraid to get creative with your toppings! Think shredded chicken, seasoned ground beef, black beans, corn, pickled jalapeños, or even some grilled veggies for a vegetarian option. The possibilities are truly endless, and each variation promises a delicious experience. I highly encourage you to give these campfire grilled nachos a try – they’re guaranteed to become a new camping favorite!
Frequently Asked Questions:
Can I make these nachos ahead of time?
While you can prep your toppings and cheese ahead of time by chopping veggies and grating cheese, it’s best to assemble and grill the nachos just before serving to ensure the chips stay crisp and the cheese is perfectly melted and gooey.
What kind of pan is best for campfire nachos?
A cast-iron skillet or a heavy-duty grill pan works wonderfully for this recipe. They distribute heat evenly and can withstand the direct heat of the campfire.
How do I prevent the chips from burning?
The key is to manage your campfire heat. Aim for medium heat, not roaring flames. You can also place the skillet on a stable grate over the coals, allowing for more controlled cooking. Keep an eye on them and rotate the skillet as needed.
Campfire Grilled Nachos
A classic campfire treat, these grilled nachos are loaded with savory ground meat, melted cheese, and fresh toppings, all cooked over an open flame for smoky flavor.
Ingredients
-
2 cups tortilla chips
-
1 lb ground pork
-
2 tablespoons taco seasoning
-
1 (15 ounce) can black beans, drained and rinsed
-
2 cups shredded cheddar cheese
-
1 cup diced tomatoes
-
1/2 cup diced red onion
-
1 avocado, diced
-
1/4 cup sliced jalapeños
Instructions
-
Step 1
In a skillet over medium heat, brown the ground pork. Drain off any excess grease. -
Step 2
Stir in the taco seasoning and cook for 1 minute more until fragrant. -
Step 3
Prepare your campfire for indirect grilling. Alternatively, use a grill basket over medium-high heat. -
Step 4
Layer the tortilla chips on a sturdy, oven-safe skillet or in a grill basket. Top with the seasoned ground pork, black beans, and shredded cheese. -
Step 5
Carefully place the skillet or grill basket over the indirect heat of the campfire or grill. Cover with foil if possible. -
Step 6
Grill for 8-10 minutes, or until the cheese is melted and bubbly. -
Step 7
Remove from heat and top with diced tomatoes, red onion, diced avocado, and sliced jalapeños.
Important Information
Nutrition Facts (Per Serving)
It is important to consider this information as approximate and not to use it as definitive health advice.
Allergy Information
Please check ingredients for potential allergens and consult a health professional if in doubt.