Easy Chocolate Swiss Roll Recipe-Quick & Delicious Treat
Easy Chocolate Swiss Roll recipes are a gateway to dessert bliss, a perfect blend of tender cake and luscious cream that seems far more complex than it actually is. There’s something undeniably magical about the way a simple sheet of chocolate sponge cake is transformed into a beautiful spiral, hiding its creamy treasure within. We all love it because it delivers that satisfying “wow” factor without the intimidation often associated with more elaborate baked goods. What makes this easy chocolate Swiss roll truly special is its inherent versatility. Whether you’re a seasoned baker looking for a quick win or a complete begin extractner eager to impress, this recipe offers a foolproof path to creating a showstopper. It’s the perfect centerpiece for any celebration, or simply a delightful treat to enjoy with a cup of tea.
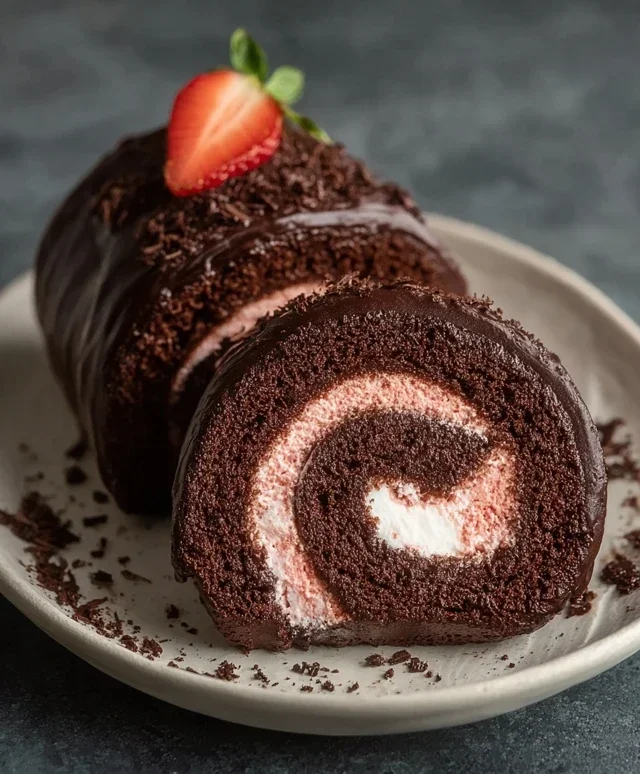
Easy Chocolate Swiss Roll
Get ready to impress yourself and your loved ones with this incredibly easy and delicious Chocolate Swiss Roll! Forget everything you thought you knew about Swiss rolls being complicated. This recipe is designed to be straightforward, using accessible ingredients and simple techniques, resulting in a beautifully rolled, decadent chocolate cake that’s perfect for any occasion. Whether you’re a seasoned baker or just starting out, you’ll find this recipe a joy to make. The rich chocolate sponge, when combined with the creamy dairy-free filling and the subtle tang of strawberries, creates a truly delightful treat.
Ingredients:
Instructions:
This recipe is broken down into clear stages to make the process as smooth as possible. We’ll start with preparing the cake batter, then move on to baking and cooling, followed by making the luscious filling, and finally, assembling your beautiful Swiss roll.
1. Preparing the Chocolate Sponge
First things first, preheat your oven to 175°C (350°F). Line a 10×15 inch (25×38 cm) jelly roll pan with parchment paper, ensuring the paper goes up the sides slightly. This will make it much easier to lift the cake out once baked. In a large bowl, whisk together the oat flour, cassava flour, 30g of cocoa powder, arrowroot starch, baking powder, and baking soda. This dry mixture forms the base of our tender chocolate cake. In a separate, clean bowl (ensure it’s grease-free), whip the aquafaba on medium speed until it becomes foamy and holds soft peaks. This aquafaba acts as our egg replacer, giving the cake structure and lightness. Gradually add 100g of the granulated sugar (or coconut sugar) to the aquafaba, continuing to whip until stiff, glossy peaks form. This is essentially creating a vegan meringue.
In another bowl, whisk together the unsweetened applesauce, dairy-free yogurt, and the remaining 100g of sugar. Gently fold this wet mixture into the whipped aquafaba in two additions, being careful not to deflate the meringue too much. Now, it’s time to combine the wet and dry ingredients. Sift the dry ingredients over the wet aquafaba mixture in three stages, gently folding after each addition until just combined. Do not overmix; overmixing can develop the gluten in the flours, leading to a tougher cake. The batter should be smooth and glossy.
2. Baking and Cooling the Cake
Pour the batter evenly into your prepared jelly roll pan and spread it with an offset spatula to create an even layer. Tap the pan gently on the counter a couple of times to release any large air bubbles. Bake for 12-15 minutes, or until a toothpick inserted into the center comes out clean and the cake springs back when lightly touched. The cake should be slightly golden around the edges but still look moist.
While the cake is baking, lay a clean kitchen towel on a flat surface and generously dust it with the 2 tbsp of cocoa powder. This is a crucial step to prevent the cake from sticking to the towel as it cools and rolls. Once the cake is out of the oven, immediately invert it onto the prepared cocoa-dusted towel. Carefully peel off the parchment paper. While the cake is still warm, gently roll it up from the short end, along with the towel. This initial rolling while warm helps set the cake’s shape and makes it easier to achieve a tight roll later. Let the rolled cake cool completely in the towel. This cooling process is essential for the cake to hold its shape without cracking when you unroll and re-roll it with the filling.
3. Crafting the Dairy-Free Chocolate Filling
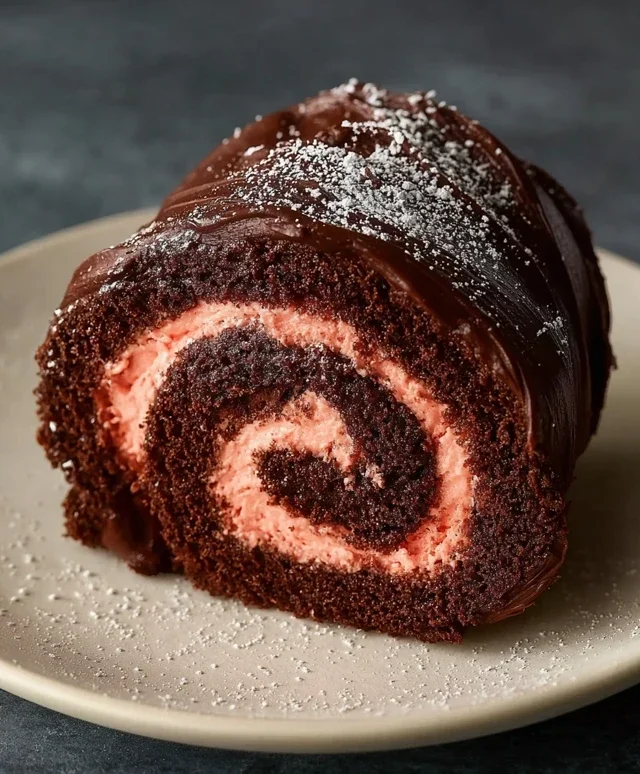
While the cake is cooling, let’s prepare the filling. In a large bowl, beat the room temperature vegan butter until it’s light and fluffy. This can be done with an electric mixer or by hand with a whisk if you have the energy! Make sure the butter is truly soft for the best results. Add the coconut fat from the chilled can of full-fat coconut cream. You’ll want to scoop out only the solid cream from the top, leaving the liquid behind. Beat this in with the vegan butter until well combined and creamy. Gradually add the freeze-dried strawberries that you’ve pulsed into a flour. The freeze-dried strawberries provide an intense strawberry flavor and a beautiful pink hue without adding extra moisture that could make the filling too soft. Continue beating until everything is thoroughly incorporated and you have a smooth, luscious, and firm frosting.
4. Assembling Your Chocolate Swiss Roll
Once the cake has cooled completely, carefully unroll it from the towel. You’ll notice it has a lovely curved shape. If any edges look a little dry or crum extractbly, you can trim them slightly with a sharp knife. Spread the dairy-free chocolate filling evenly over the surface of the unrolled cake, leaving a small border (about 1-2 cm) along the edges. This border will prevent the filling from oozing out too much when you roll it up. Arrange the sliced strawberries in a single layer over the filling, about two-thirds of the way down the cake. This placement ensures that when you roll, the strawberries are nestled in the center.
5. The Final Roll and Garnish
Now, it’s time for the satisfying part: re-rolling! Starting from the same short end you rolled the cake up with initially, carefully and tightly roll the cake again, this time without the towel. Gently tuck the towel back inside the roll as you go, or remove it completely and proceed with rolling the cake itself. The goal is to create a tight, even roll. Once rolled, you can gently shape it with your hands if needed. Place the rolled Swiss roll seam-side down on a serving platter. For an extra touch of elegance, you can dust the top with a little more cocoa powder or some of the freeze-dried strawberry flour. Chill the Swiss roll in the refrigerator for at least 30 minutes to an hour. This allows the filling to firm up and the cake to set, making it easier to slice cleanly. Slice into generous portions and enjoy your homemade masterpiece!
Conclusion:
And there you have it – your very own Easy Chocolate Swiss Roll! I truly hope you enjoyed this journey into creating this delightful dessert. This recipe is fantastic because it proves that impressive-looking treats don’t have to be complicated. The combination of a light, airy sponge and a rich, creamy chocolate filling makes it a winner for any occasion, from a casual afternoon tea to a special celebration. It’s incredibly satisfying to see that rolled cake, dusted with a little cocoa, come together perfectly.
For serving, I love slicing it generously and enjoying it with a dollop of whipped cream or a fresh berry compote. It’s also divine served alongside a hot cup of coffee or tea. Don’t be afraid to experiment with variations! You could try adding a swirl of raspberry jam under the chocolate ganache for a lovely fruitiness, or even a hint of espresso powder to the sponge for a mocha twist. The possibilities are truly endless!
I wholeheartedly encourage you to give this Easy Chocolate Swiss Roll a try. You might be surprised at how achievable and rewarding it is. Let me know how yours turns out – I can’t wait to hear about your delicious creations!
Frequently Asked Questions:
Why is my Swiss roll cake cracking when I roll it?
Cracking often happens if the cake is overbaked, making it too dry and brittle. Ensure you’re baking it just until it springs back lightly when touched. Cooling it too much before rolling can also contribute. Try rolling it while it’s still slightly warm.
Can I make the chocolate filling ahead of time?
Absolutely! The chocolate ganache or buttercream filling can be made a day or two in advance and stored in the refrigerator. Just let it soften slightly at room temperature before spreading it onto the cooled cake. This can save you valuable time when you’re assembling your Easy Chocolate Swiss Roll.
What if I don’t have parchment paper?
While parchment paper is ideal for preventing sticking and ensuring an even bake, you can grease and flour your baking pan very thoroughly if you’re in a pinch. However, parchment paper significantly increases your chances of success and makes for a much cleaner release of the cake, which is crucial for rolling.
Easy Chocolate Swiss Roll
A simple and delicious vegan chocolate swiss roll recipe, perfect for any occasion.
Ingredients
-
135 g oat flour
-
30 g cassava flour
-
30 g cocoa powder
-
1 tbsp arrowroot starch
-
1 1/2 tsp baking powder
-
1/2 tsp baking soda
-
122 mL aquafaba, room temperature
-
200 g organic granulated sugar or coconut sugar, divided
-
100 g unsweetened applesauce, room temperature
-
60 g unsweetened dairy free yogurt, room temperature
-
2 tbsp cocoa powder for dusting the dish towel
-
1 cup sliced strawberries, for garnish
-
226 g vegan butter, room temperature
-
70 g freeze dried strawberries, pulsed into a flour
-
Coconut fat from 1 can full-fat coconut cream
Instructions
-
Step 1
Preheat oven to 175°C (350°F). Line a 10×15 inch baking sheet with parchment paper and grease lightly. Dust a clean kitchen towel with 2 tbsp cocoa powder. -
Step 2
In a large bowl, whisk together oat flour, cassava flour, 30g cocoa powder, arrowroot starch, baking powder, and baking soda. -
Step 3
In a separate bowl, whip the aquafaba until frothy. Gradually add 100g of the sugar and continue whipping until stiff peaks form, like meringue. -
Step 4
Gently fold the dry ingredients into the aquafaba mixture in three additions, alternating with the applesauce and dairy-free yogurt until just combined. -
Step 5
Spread the batter evenly into the prepared baking sheet. Bake for 12-15 minutes, or until a toothpick inserted into the center comes out clean. -
Step 6
While the cake is baking, prepare the frosting. Beat the vegan butter until creamy. Add the remaining 100g sugar, pulsed freeze-dried strawberries, and coconut cream. Beat until smooth and fluffy. -
Step 7
Immediately after removing the cake from the oven, invert it onto the cocoa-dusted towel. Peel off the parchment paper. Carefully roll up the cake with the towel from the short end. -
Step 8
Let the rolled cake cool completely on a wire rack. Once cool, carefully unroll the cake. Spread the frosting evenly over the surface. Roll up tightly, without the towel this time. -
Step 9
Chill the swiss roll for at least 30 minutes before slicing and serving with sliced strawberries.
Important Information
Nutrition Facts (Per Serving)
It is important to consider this information as approximate and not to use it as definitive health advice.
Allergy Information
Please check ingredients for potential allergens and consult a health professional if in doubt.